독립된 테스트 전용 DB 구성의 필요성
통합테스트 혹은 DB 데이터를 사용하는 테스트를 수행할때,
개발환경 전용 DB를 사용한다 하더라도 아래와 같은 문제가 발생 할 수 있습니다.
- 여러 개발자들이 테스트를 동시 수행하면서 의도치 않은 데이터 변경으로 인한 테스트케이스 실패
- 직접 컨트롤 할수 없는 테이블 사용으로 인한 테스트케이스 실패 (ex. ETL 테이블)
- 기타 다양한 이유로인한 데이터 변경으로 인한 테스트케이스 실패
H2 쿼리 호환성 체크
위와같은 이유로 인해 테스트 수행시에만 별도의 DB 환경을 이용해 독립된 테스트를 수행 할 수 있지 않을까하고 H2를 사용한 독립 테스트환경 구상을 해 보았습니다.
(+ 인메모리 DB 사용으로 테스트 속도의 향상의 결과도 얻을 수 있을거라 판단했습니다.)
우선, 한가지 전제가 필요했습니다.
저희팀에서는 MySQL을 사용하고 있기때문에, 테스트 코드에서도 MySQL으로 작성된 쿼리가 동작 할 수 있어야 합니다.
다행히도 H2에서는 Compatibility mode를 지원해, 다른 DB 쿼리의 호환성을 제공해주고 있습니다.
현재 H2에서 지원하는 DB는Oracle, MySQL, MariaDB, MSSql, PostgreSQL, Ignite 가 있습니다.
공식문서를 찾아 정확히 MySQL의 어떤 특수 문법들이 지원되는지 확인해보겠습니다.
- CREATE TABLE 문법 내부에서 Index 생성
- 부동소수점 숫자 정수 변환시 자동 반올림
- NULL Concat시 다른 결과 반환
- INSERT DUPLICATE KEY UPDATE 지원
- INSERT IGNORE 부분적 지원 (skip duplicate key insert)
- REPLACE INTO 부분적 지원
- …
MySQL Compatibility Mode To use the MySQL mode, use the database URL jdbc:h2:~/test;MODE=MySQL;DATABASE_TO_LOWER=TRUE. Use this mode for compatibility with MariaDB too. When case-insensitive identifiers are needed append ;CASE_INSENSITIVE_IDENTIFIERS=TRUE to URL. Do not change value of DATABASE_TO_LOWER after creation of database.
Creating indexes in the CREATE TABLE statement is allowed using INDEX(..) or KEY(..). Example: create table test(id int primary key, name varchar(255), key idx_name(name)); When converting a floating point number to an integer, the fractional digits are not truncated, but the value is rounded. Concatenating NULL with another value results in the other value. ON DUPLICATE KEY UPDATE is supported in INSERT statements, due to this feature VALUES has special non-standard meaning is some contexts.
INSERT IGNORE is partially supported and may be used to skip rows with duplicate keys if ON DUPLICATE KEY UPDATE is not specified.
REPLACE INTO is partially supported.
REGEXP_REPLACE() uses \ for back-references for compatibility with MariaDB.
Datetime value functions return the same value within a command.
0x literals are parsed as binary string literals.
Unrelated expressions in ORDER BY clause of DISTINCT queries are allowed.
Some MySQL-specific ALTER TABLE commands are partially supported.
TRUNCATE TABLE restarts next values of generated columns.
Text comparison in MySQL is case insensitive by default, while in H2 it is case sensitive (as in most other databases). H2 does support case insensitive text comparison, but it needs to be set separately, using SET IGNORECASE TRUE. This affects comparison using =, LIKE, REGEXP.http://www.h2database.com/html/features.html#compatibility
대부분의 MySQL 전용 쿼리들이 지원되는것을 확인 했기때문에, 테스트 전용 DB를 구축해보도록 하겠습니다.
독립된 테스트 전용 DB 구축
테스트를 위해 전용 profile 설정으로 H2 datasource를 구성 할 수 있습니다.
예제에서는 “test” profile을 사용해 환경을 구축해보도록 하겠습니다.
// IntegrationTest.java

@ActiveProfiles("test")
@SpringBootTest
@AutoConfigureMockMvc
public abstract class IntegrationTest
{
    @Autowired
    protected MockMvc mockMvc;
}
// application.yml

...

---
####################################################################################################
## test 전용 환경
####################################################################################################

spring:
  config:
    activate:
      on-profile: test
  h2:
    console:
      enabled: true
  jpa:
    database: h2
    generate-ddl: off
  datasource:
    driver-class-name: org.h2.Driver
    url: jdbc:h2:mem:testdb;MODE=MySQL;
    username: SA
    password:
    initialization-mode: always
    schema: classpath:schema-h2.sql
    data: classpath:data-h2.sql

...
위와같이 단순히 @ActiveProfiles("test") 를 통해 test 전용 profile을 설정해 H2 datasource를 구성 해 줄 수 있습니다.
잊지 마셔야 할 것은, 테스트 환경이 구동할때마다 초기화된 H2가 구성되기 때문에, 초기 schema, data sql 쿼리를 추가해 초기데이터를 구성 해 주셔야 합니다.
만약 java config를 통해 datasource를 구성했다면, TestConfig 추가로 datasource를 설정해줄수 있습니다.
// TestDatasourceConfig.java


@TestConfiguration
public class TestDatasourceConfig
{
    @Primary
    @Bean
    public DataSource dataSource()
    {
        HikariDataSource hikariDataSource = (HikariDataSource) DataSourceBuilder.create()
            .driverClassName("org.h2.Driver")
            .url("jdbc:h2:mem:testdb;MODE=MySQL")
            .username("SA")
            .password("")
            .build();

        return hikariDataSource;
    }


    ...
}
// IntegrationTest.java


@ActiveProfiles("test")
@ContextConfiguration(classes = {TestDatasourceConfig.class})
@SpringBootTest
@AutoConfigureMockMvc
public abstract class IntegrationTest
{
    @Autowired
    protected MockMvc mockMvc;
}
실제 통합테스트를 구현할때는 아래와 같이 간단하게 수행 가능하게 될 것 입니다.
// UserIT.java

public class UserIT extends IntegrationTest
{
    @Test
    void getUsers_success()
    {
        //given

        //when

        //then
        mockMvc.get()
        ...
    }
}
실제 수행 결과
// schema-h2.sql
create table user
(
    id       varchar(40)  not null
        primary key,
    password varchar(400) not null,
    name     varchar(20)  not null
);
// data-h2.sql

insert into user(id, password, name)
values ('test-admin', '123', 'admin');

insert into user(id, password, name)
values ('test-user', '123', 'user');
@DisplayName("User 통합 테스트")
public class UserIT extends IntegrationTest
{
    @DisplayName("User1 등록")
    @BeforeEach
    void beforeEach_setUser1() throws Exception
    {
        // given
        String givenUserId = RandomStringUtils.random(10, true, false);
        UserDto.Req givenUser = new UserDto.Req();
        givenUser.setId(givenUserId);
        givenUser.setPassword("sample_password");
        givenUser.setName("sample_user_1");

        // when - then
        MockHttpServletRequestBuilder rq = MockMvcRequestBuilders.post("/users")
            .content(new ObjectMapper().writeValueAsString(givenUser))
            .contentType(MediaType.APPLICATION_JSON);

        mockMvc.perform(rq)
            .andDo(log())
            .andExpect(status().isOk());
    }


    @DisplayName("전체 User 조회 -> 성공")
    @Test
    void getAllUsers_success() throws Exception
    {
        // given
        MockHttpServletRequestBuilder rq = MockMvcRequestBuilders
            .get("/users")
            .contentType(MediaType.APPLICATION_JSON);

        // when - then
        mockMvc.perform(rq)
            .andDo(print())
            .andExpect(status().isOk())
            .andExpect(jsonPath("$", hasSize(greaterThan(1))));
    }
}
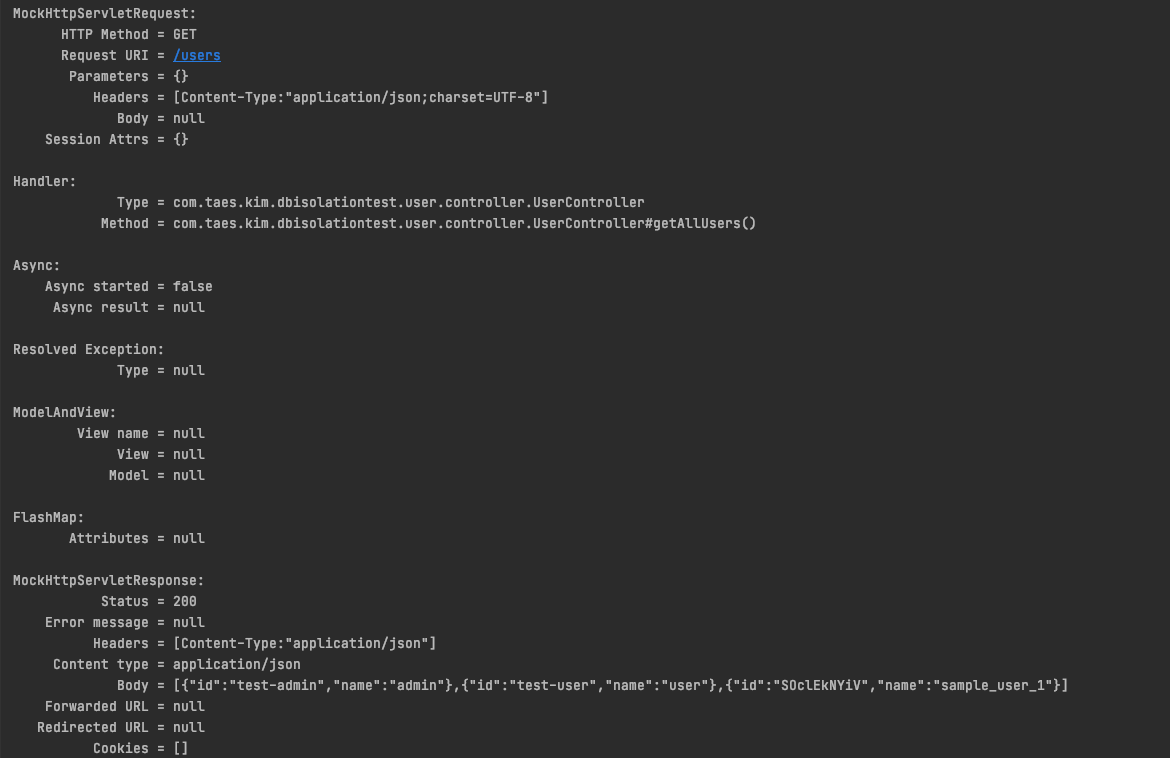
위 테스트 결과를 보면, H2에서 설정한 스키마와 초기 설정한 데이터를 사용해 의도했던대로 테스트가 성공했습니다.
또한 H2의 특성상 테스트가 완료되고나면 별도의 롤백 작업 없이도 데이터가 초기화 되기때문에 몇번을 수행해도 동일한 결과를 얻을 수 있음을 보장 받을수 있습니다.
프로젝트 전체 코드는 아래 git 저장소에서 확인하실수 있습니다.
(https://github.com/taes-k/spring-h2-isolation-db-test)
효용성
위 구성을 통해 독립적인 H2 DB 테스트환경이 갖추어졌다고 했을때 장단점을 살펴보도록 하겠습니다.
장점
- 외부 영향없이 완벽하게 독립적인 데이터로 테스트가 가능하다.
- 타 DB 서비스 정상 동작 여부에 영향을 받지 않는다. (외부 DB 커넥션 없음)
- 원하는 테스트 데이터를 마음대로 구성 할 수 있다.
- 테스트 수행후 데이터 롤백이 필요 없다.
- 임베디드 DB 사용으로 빠른 결과 도출을 기대 할 수 있다.
단점
- 개발사항에 따라 스키마 초기화 구성을 최신화 시켜줘야 한다.
- 프로젝트가 커질수록 초기화 해야 할 테스트 데이터 양이 많아 질 수 있다.
- 실제 쿼리 수행과 완벽하게 동일하지 않을 수 있다. (MySQL ↔ H2)
데이터와 스키마를 매번 구성해야 하기 때문에 몇가지 단점이 존재하지만, 테스트의 특성상 항상 성공하는 테스트를 만들기 위해 데이터 초기화는 필수적으로 수행되야 하기때문에 충분히 장점으로 커버 할 수 있다는 생각이 듭니다.
또한, 초기화 데이터 역시 Git으로 관리되기 때문에 팀원들과의 협업에서도 잘 관리되는 데이터를 유지 할 수 있을것이라 생각합니다.