2.13 Spring MSA (4) - 인증서비스
MSA를 구성하면서보안을 위해 Oauth2를 일반적으로 사용하게 됩니다. 특히 스프링에서 제공하는 Spring cloud security를 사용하게되면 Token 링레이 방식으로 게이트웨이에서 얻은 인증토큰을 매칭된 서비스까지 넘겨서 최종 인증을 진행하는 과정을 거치게 됩니다. 이번챕터에서는 이전챕터에 이어 Spring cloud security를 이용해 api 서비스들을 인증서비스와 연동하는 과정을 알아보도록 하겠습니다.
Contents List
2.13.1) Oauth2 인증과정
먼저 일반적인 Oauth2 인증과정이 어떻게 일어나는지 알아보도록 하겠습니다.
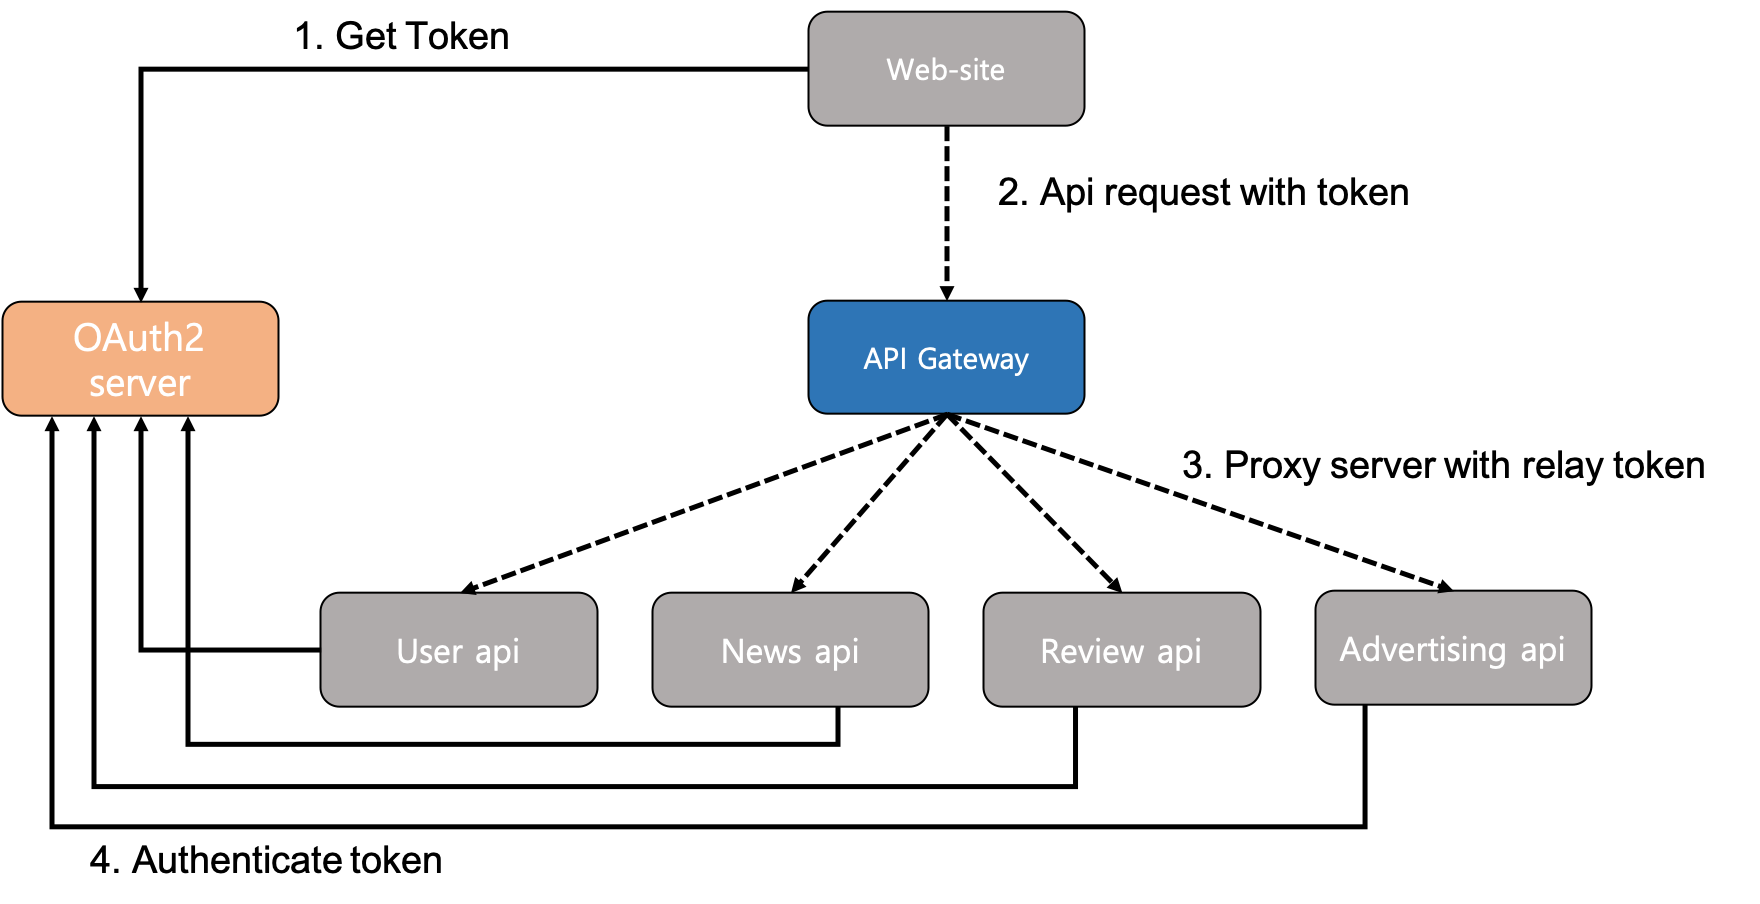
위의 다이어그램에서 확인 할수있듯이 먼저, 인증서버로부터 토큰을 발급받아 API Gateway로 Token을 포함시켜 요청하게되면 API Gateway에서는 요청 api를 매칭하여 받은 토큰을 함께 보내주게됩니다. 이과정을 relay token이라고 지칭합니다. 이후 토큰과 request를 받은 api 서버는 해당 토큰이 유효한 토큰인지를 확인하기위해 인증 서버로 토큰을 보내 확인후, 유효한 토큰이라면 설정에 따라 결과를 반환해 줍니다.
위 과정중 마지막 4번 단계에서 토큰을 다시 인증서버로 보내 재 인증하는 과정이 나오는데, 이는 JWT(Json Web Token)의 사용으로 인증과정을 조금더 간편하게 만들어 줄 수 있습니다. JWT는 필요한 정보를 자체적으로 지닌상태로 암호화된 토큰 입니다. JWT를 사용한 인증과정은 다음과 같습니다.
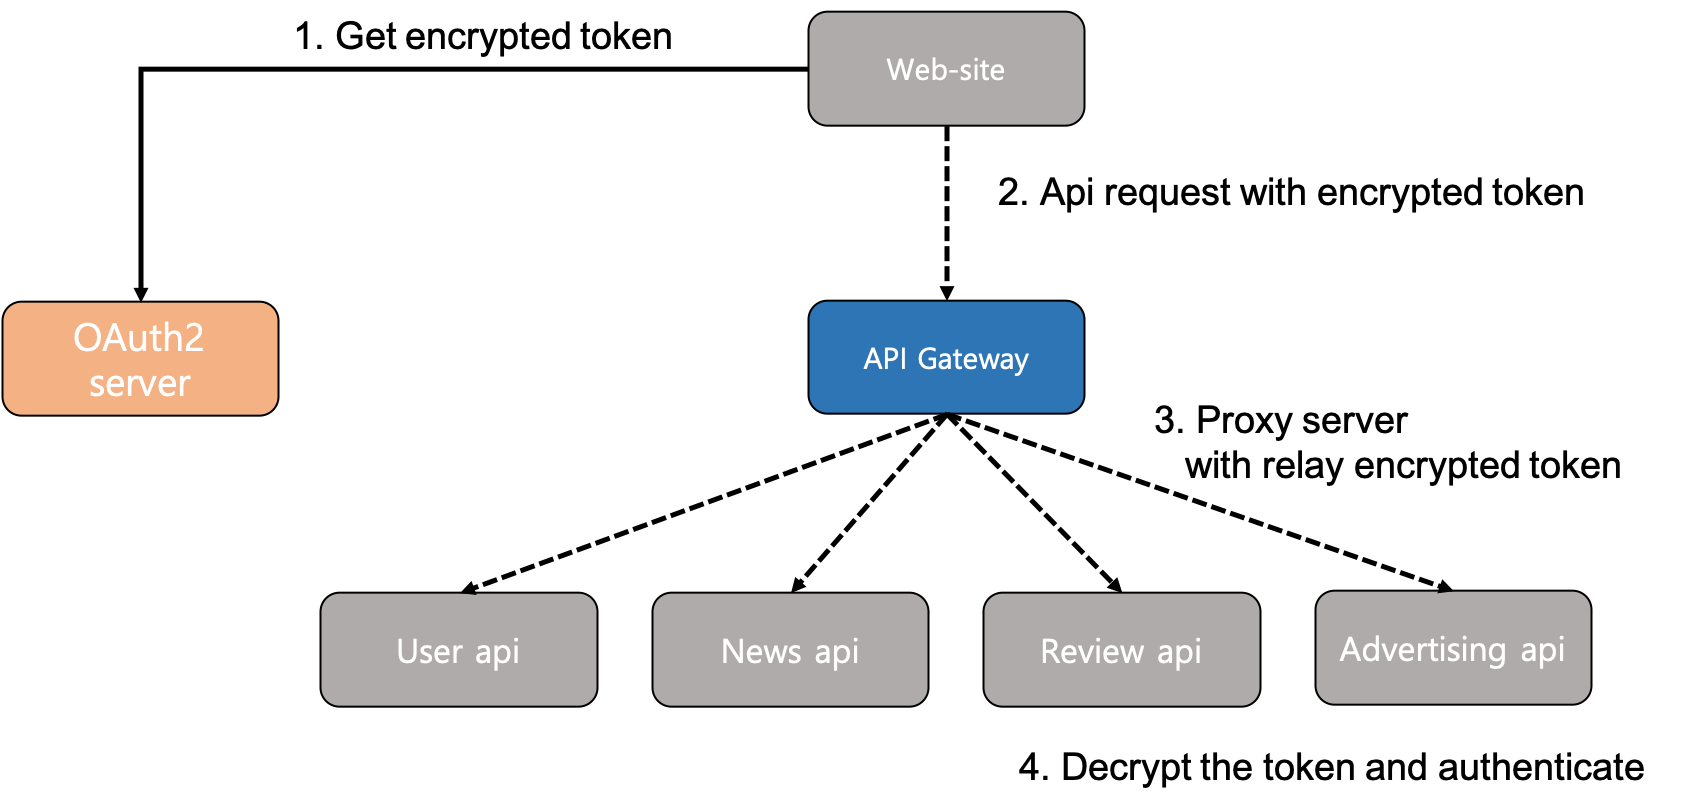
이번 MSA 예제 프로젝트의 인증과정은 위와같이 JWT를 사용하여 구현해보도록 하겠습니다.
2.13.2) Spring cloud OAuth2
OAuth2인증서버
먼저, 인증서버를 구현해보도록 하겠습니다.
구동환경
- Spring boot 2.1.5
- Spring cloud security
- Spring cloud oauth2
- H2
OAuth2 Authorization Server 구현
// build.gradle

dependencies {
    implementation 'org.springframework.boot:spring-boot-starter-web'
    implementation 'org.springframework.cloud:spring-cloud-starter-oauth2'
    implementation 'org.springframework.cloud:spring-cloud-starter-security'
    compile 'org.springframework.boot:spring-boot-starter-data-jpa'
    compile 'org.projectlombok:lombok:1.18.6'
    compile 'com.h2database:h2'
    developmentOnly 'org.springframework.boot:spring-boot-devtools'
    testImplementation 'org.springframework.boot:spring-boot-starter-test'
}
// application.properties

server.port=8095
security.oauth2.client.client-id=auth_id
security.oauth2.client.client-secret=auth_secret
security.oauth2.resource.jwt.key-value=jwt_secret_key

spring.h2.console.enabled=true
spring.h2.console.path=/h2-console
// AuthConfiguration.java

@Configuration
@EnableAuthorizationServer
@SpringBootApplication
public class AuthConfiguration extends AuthorizationServerConfigurerAdapter {

    @Autowired
    private ClientDetailsService clientDetailsService;

    @Autowired
    private AuthenticationManager authenticationManager;

    @Autowired
    private ResourceServerProperties resourceServerProperties;

    @Override
    public void configure(AuthorizationServerEndpointsConfigurer endpoints)
    throws Exception {
        // 인증 과정 endpoint에 대한 설정을 해줍니다.
        super.configure(endpoints);
        endpoints.accessTokenConverter(jwtAccessTokenConverter())
        .authenticationManager(authenticationManager);
    }

    @Override
    public void configure(ClientDetailsServiceConfigurer clients) throws Exception {
        // oauth_client_details 테이블에 등록된 사용자로 조회합니다.
        clients.withClientDetails(clientDetailsService);
    }

    @Bean
    @Primary
    public JdbcClientDetailsService JdbcClientDetailsService(DataSource dataSource) {
        // Jdbc(H2 데이터베이스)를 이용한 Oauth client 정보등록을 위한 설정입니다.
        return new JdbcClientDetailsService(dataSource);
    }

    @Bean
    public JwtAccessTokenConverter jwtAccessTokenConverter() {
        // JWT key-value 방식을 사용하기 위한 설정입니다.
        JwtAccessTokenConverter accessTokenConverter = new JwtAccessTokenConverter();
        accessTokenConverter.setSigningKey(resourceServerProperties.getJwt().getKeyValue());

        return accessTokenConverter;
    }

}
@EnableAuthorizationServer 어노테이션을 추가하여 Oauth 인증서버의 환경설정을 작성해줍니다. 이때, OAuth 계정에대한 데이터 위치 설정 (H2)및 JWT 토큰 사용을 위한 설정을 작성해 줄 수 있습니다.
위의 설정을 통해 Oauth client 정보를 H2로부터 불러오게 했기때문에 Oauth 인증을 위한 H2 스키마를 구성해야 합니다. 해당 스키마는 Oauth에서 제공하고 있으므로 ‘src/main/resources’폴더 하단에 schema.sql을 작성해 두면 프로젝트가 실행될때마다 H2에 자동으로 스키마가 생성되어 집니다.
create table oauth_client_details (
    client_id VARCHAR(256) PRIMARY KEY,
    resource_ids VARCHAR(256),
    client_secret VARCHAR(256),
    scope VARCHAR(256),
    authorized_grant_types VARCHAR(256),
    web_server_redirect_uri VARCHAR(256),
    authorities VARCHAR(256),
    access_token_validity INTEGER,
    refresh_token_validity INTEGER,
    additional_information VARCHAR(4096),
    autoapprove VARCHAR(256)
);

insert into oauth_client_details (client_id, client_secret, resource_ids, scope, authorized_grant_types, web_server_redirect_uri, authorities, access_token_validity, refresh_token_validity, additional_information, autoapprove) values ('auth_id', '{noop}auth_secret', null, 'read,write', 'authorization_code,password,client_credentials,implicit,refresh_token', null, 'ROLE_MY_CLIENT', 36000, 2592000, null, null);
위의 Oauth 인증과정이 끝나게 되면 endpoint에서 지정해준것 처럼 authenticationManager spring security 인증과정이 진행됩니다. 자체 계정인증을 통해 토큰을 발급해 줄 수 있도록 하게위해 spring security 인증을 위한 구현도 함께 진행해주도록 하겠습니다.
Spring Security 구현
// User.java

@Entity
@Table(name="T_USER")
@Data
public class User {

    @Id
    @GeneratedValue(strategy=GenerationType.IDENTITY)
    private int id;

    @Column(name = "user_name", length = 20, unique = true, nullable = false)
    private String username;
    @Column(length = 400, nullable = false)
    private String password;
    @Column(name = "user_type", nullable = false)
    private int userType;
    @Column(nullable = false)
    private Date date;
}
// UserDao.java

@Repository ("UserDao")
public interface UserDao extends JpaRepository<User, Integer> {

    User findByUsername(String username);

}
// UserInformation.java

@Data
public class UserInformation implements UserDetails {

    private String username;
    private String password;
    private List<GrantedAuthority> authorities;

    @Override
    public boolean isAccountNonExpired() {
    // TODO Auto-generated method stub
    return true;
    }

    @Override
    public boolean isAccountNonLocked() {
    // TODO Auto-generated method stub
    return true;
    }

    @Override
    public boolean isCredentialsNonExpired() {
    // TODO Auto-generated method stub
    return true;
    }

    @Override
    public boolean isEnabled() {
    // TODO Auto-generated method stub
    return true;
    }
}
@Service ("UserInformationService")
public class UserInformationService implements UserDetailsService {

    @Resource (name="UserDao")
    private UserDao UserDao;


    @Override
    public UserDetails loadUserByUsername(String username) throws UsernameNotFoundException {

        User user = UserDao.findByUsername(username);

        // 저장된 ID가 없을때 throw 시켜줍니다.
        if(user == null) {
            throw new UsernameNotFoundException("wrongId"); // 저장된 ID 없음
        }
        return makeLoginUser(user);
    }

    // UserInformation 값 주입 해 줍니다.
    public UserInformation makeLoginUser(User user) {

        UserInformation loginUser  = new UserInformation();

        List<GrantedAuthority> Authoritylist = new ArrayList<>();
        switch(user.getUserType()) {
            case 0 :
                // admin
                Authoritylist.add(new SimpleGrantedAuthority("ADMIN"));
            case 1 :
                // user
                Authoritylist.add(new SimpleGrantedAuthority("USER"));
            break;
        }

        loginUser.setUsername(user.getUsername());
        loginUser.setPassword(user.getPassword());
        loginUser.setAuthorities(Authoritylist);

        return loginUser;
    }
}
// WebSecurityconfig.java

@EnableWebSecurity
public class WebSecurityconfig extends WebSecurityConfigurerAdapter  {

    @Autowired
    private UserInformationService userInformationService;

    @Override
    public void configure(HttpSecurity http) throws Exception {
        // h2 데이터를 확인하기위해 h2-console url의 권한을 permitAll으로 바꾸어 줍니다.
        http.authorizeRequests()
        .antMatchers("/h2-console/**").permitAll()
        .and().csrf().disable()
        .headers().disable();
    }

    @Override
    public void configure(AuthenticationManagerBuilder builder)
    throws Exception {
        // custom user인증 서비스를 사용하기위한 설정입니다.
        builder.authenticationProvider(authenticationProvider());
    }


    @Bean
    @Override
    public AuthenticationManager authenticationManagerBean() throws Exception {
        // authenticationManage 빈 등록
        return super.authenticationManagerBean();
    }

    @Bean
    public static PasswordEncoder passwordEncoder() {
        // Spring5부터 PasswordEncoder 지정은 필수로 진행해주어야 합니다.
        return PasswordEncoderFactories.createDelegatingPasswordEncoder();
    }

    @Bean
    public DaoAuthenticationProvider authenticationProvider() {
        // custom user인증 서비스를 사용하기위한 설정입니다.
        DaoAuthenticationProvider authenticationProvider = new DaoAuthenticationProvider();
        authenticationProvider.setUserDetailsService(userInformationService);
        authenticationProvider.setPasswordEncoder(passwordEncoder());
        return authenticationProvider;
    }

}
계정 세팅
자 이로서 스프링 시큐리티와 Oauth 인증을 위한 설정이 모두 완료되었습니다. 초기 계정 세팅을 위한 설정을 마지막으로 진행하고 테스트를 해보도록 하겠습니다.
// DataInitializer.java

@Component
public class DataInitializer implements ApplicationRunner {

    @Resource (name="UserDao")
    private UserDao UserDao;

    @Override
    public void run(ApplicationArguments args) throws Exception {

        User newUser = new User();
        PasswordEncoder passwordEncoder;
        passwordEncoder = PasswordEncoderFactories.createDelegatingPasswordEncoder();
        newUser.setUsername("taes");
        newUser.setPassword(passwordEncoder.encode("luke"));
        newUser.setUserType(0);
        newUser.setDate(new Date());
        UserDao.save(newUser);
    }
}
Token 발급 테스트
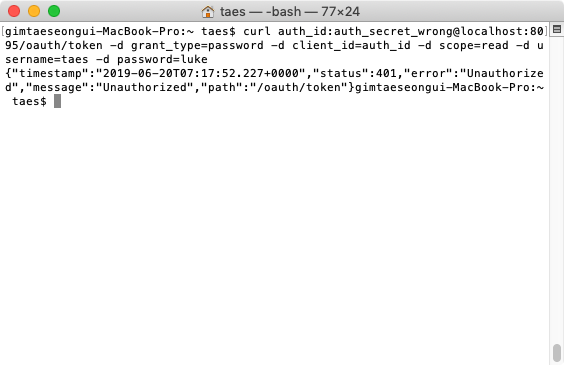
설정과 계정정보 세팅이 완료되었으니 직접 토큰을 발급받아보도록 하겠습니다. 인증에 사용할 grant_type은 password방식으로 다음과같은 Get request를 통해 토큰을 발급 받을 수 있습니다.
curl (client_id):(client_secret)@localhost:8095/oauth/token -d grant_type=password -d client_id=(client_id) -d scope=read -d username=(username) -d password=(password)
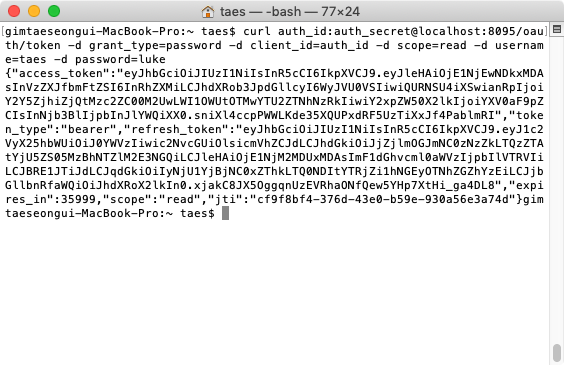
access_toekn :
eyJhbGciOiJIUzI1NiIsInR5cCI6IkpXVCJ9.eyJleHAiOjE1NjEwNDkxMDAsInVzZXJfbmFtZSI6InRhZXMiLCJhdXRob3JpdGllcyI6WyJVU0VSIiwiQURNSU4iXSwianRpIjoiY2Y5ZjhiZjQtMzc2ZC00M2UwLWI1OWUtOTMwYTU2ZTNhNzRkIiwiY2xpZW50X2lkIjoiYXV0aF9pZCIsInNjb3BlIjpbInJlYWQiXX0.sniXl4ccpPWWLKde35XQUPxdRF5UzTiXxJf4PablmRI
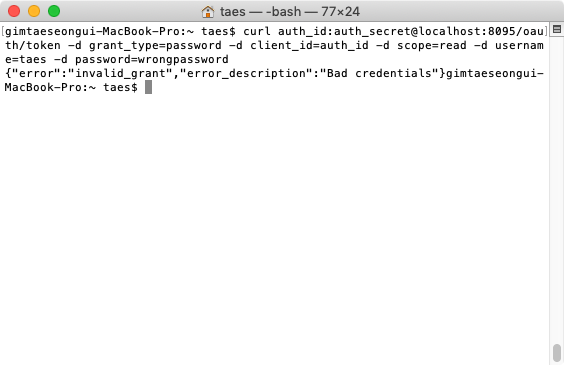
위와같이 성공적으로 token이 받아지는 것을 확인 할 수 있습니다. 만약 password가 틀리거나, client_secret,id가 다를경우에는 아래와같은 에러 메세지와함께 토큰이 정상적으로 발급받아지지 않는것을 확인 하실수 있으실 겁니다.
그렇다면 위 토큰에는 어떤 정보를 담고있는걸까요? http://jwt.io에서 토큰을 해독하여 내용을 확인하실수 있습니다. 위의 토큰에 담긴 내용은 다음과 같습니다.
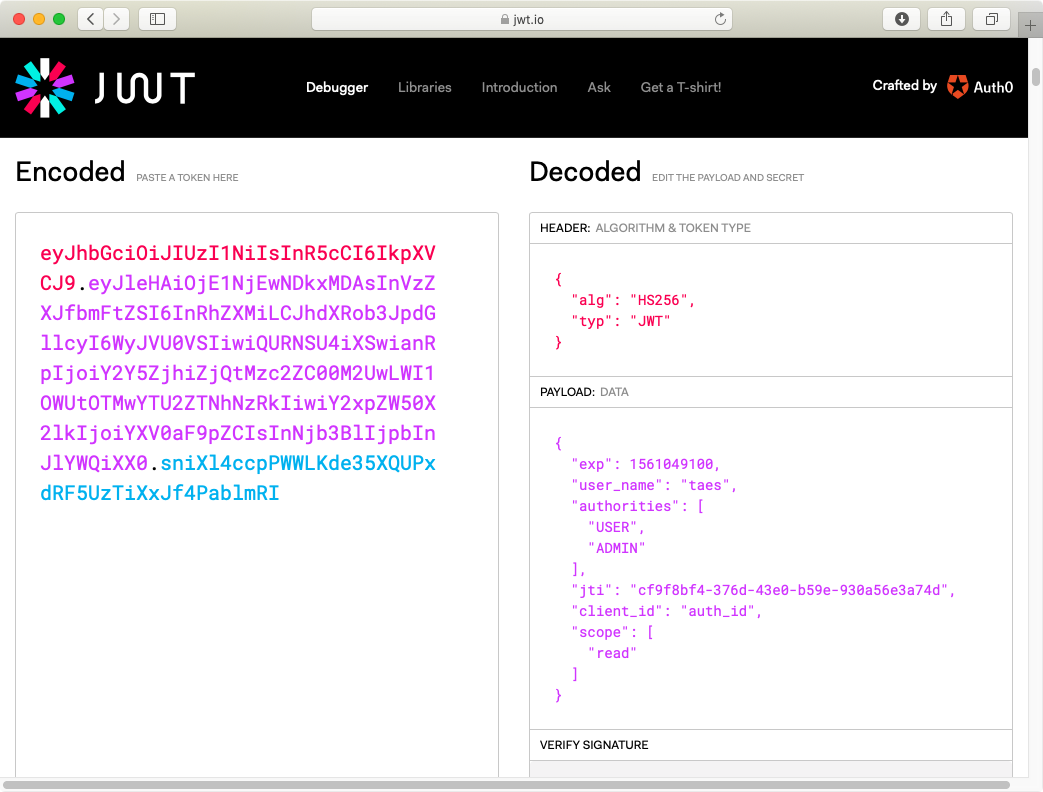
처음에 설명드렸다시피 JWT는 자체적으로 필요한 정보를 가지고 있어 꽤나 많은 정보들을 포함하고 있습니다. 인증한 user_name, 스프링 시큐리티에서 설정해준 authorities, client_id , scope, 토큰 유효시간 등의 정보가 토큰내에 저장되어있는것을 확인 할 수 있습니다.
OAuth2 Resource server
이제 토큰을 직접 해독하여 서비스에 적용할 api 서비스들에 OAuth 인증과정을 추가해보도록 하겠습니다. msa-user-api서비스를 대표로 적용해보도록 하겠습니다.
OAuth2 Resource server 구현
// build.gradle

implementation 'org.springframework.cloud:spring-cloud-starter-oauth2'
먼저, oauth2 dependency를 추가해줍니다.
// application.properties

security.oauth2.client.client-id=auth_id
security.oauth2.client.client-secret=auth_secret
security.oauth2.resource.jwt.key-value=jwt_secret_key
여기서 주의하실점은, key-value를 서버에서 설정한것과 똑같이 설정해주셔야 jwt가 제대로 인증될 수 있습니다.
// ResourceConfig.java

@EnableResourceServer
@Configuration
public class ResourceServerConfig extends ResourceServerConfigurerAdapter{

    @Override
    public void configure(HttpSecurity http) throws Exception {
        http.headers().frameOptions().disable();
        http.authorizeRequests()
        .antMatchers("/").access("#oauth2.hasScope('read')")
        .anyRequest().authenticated();
    }
}
해당 ResourceServer설정을 통해 인증정보에 따라 request 처리 여부를 결정해 줄 수 있습니다.
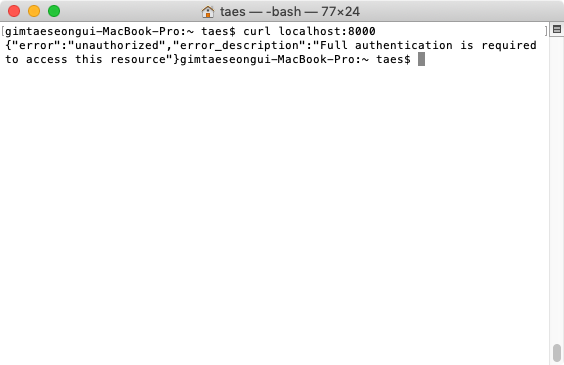
Oauth2 ResourceServer가 제대로 설정되었는지 확인해보도록 하겠습니다. 위의 설정을 통해 /URL 접근시 ‘read’oauth2 scope가 있어야지 접근 가능하도록 설정 해두었으므로 토큰없이 접근시 접근이 제한되어야 정상이어야 합니다.
결과 확인
curl localhost:8000/
curl localhost:8000/ -H "Authorization: Bearer eyJhbGciOiJIUzI1NiIsInR5cCI6IkpXVCJ9.eyJleHAiOjE1NjEwNDkxMDAsInVzZXJfbmFtZSI6InRhZXMiLCJhdXRob3JpdGllcyI6WyJVU0VSIiwiQURNSU4iXSwianRpIjoiY2Y5ZjhiZjQtMzc2ZC00M2UwLWI1OWUtOTMwYTU2ZTNhNzRkIiwiY2xpZW50X2lkIjoiYXV0aF9pZCIsInNjb3BlIjpbInJlYWQiXX0.sniXl4ccpPWWLKde35XQUPxdRF5UzTiXxJf4PablmRI"
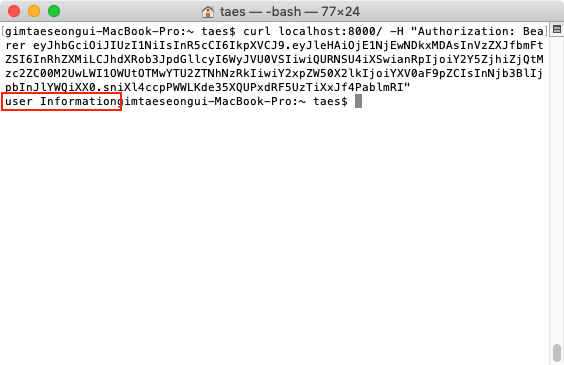
위의 터미널창에서 잘 확인이 되지않아 post man으로 다시 확인 해 보았습니다.
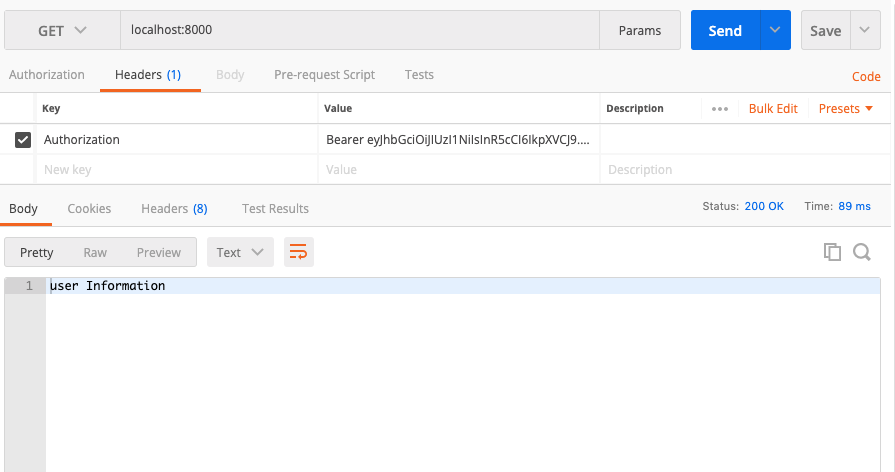
인증 과정까지 잘 작동하는것을 확인하실수 있습니다.
인증 게이트웨이
자, 위에서 인증서버와 클라이언트를 즉 처음과 끝의 구현이 완료 되었습니다. 이렇게 끝나면 좋겠지만.. 저희는 API Gateway를 사용하기때문에 사실 직접적으로 api 서버에 접근하지 않기때문에 중간 Gateway에서 토큰을 전달해주어야 한다고 말씀드렸습니다. 마지막으로 게이트웨이의 Relay token을 위한 구현을 진행해보도록 하겠습니다.
OAuth2 인증 구현
// build.gradle

implementation 'org.springframework.cloud:spring-cloud-starter-oauth2'
// application.properties


security.oauth2.client.client-id=auth_id
security.oauth2.client.client-secret=auth_secret
security.oauth2.resource.jwt.key-value=jwt_secret_key

zuul.sensitiveHeaders= Cookie,Set-Cookie
zuul.zuul.sensitiveHeaders을 통해 헤더값이 하뒤 서비스들로 전달되어 노출되지 않도록 설정할수 있습니다. 기본값으로 cookie, Set-Cookie, Authorization이 전달이 되지 않도록 설정 되어있기 때문에 Authorization을 하위 서비스들에 넘겨줄수있도록 Cookie, Set-Cookie만 sensitiveHeader로써 설정해 줍니다.
// ResourceServerConfig.java

@Configuration
@EnableResourceServer
class ResourceServerConfig extends ResourceServerConfigurerAdapter {

    @Override
    public void configure(HttpSecurity http) throws Exception {
        http.authorizeRequests()
        .antMatchers("/api/user").authenticated();
    }
}
이전단계에서 Api 서버에 ResourceServer 설정을 해주었던것 처럼 url별 인증 설정을 통해 api 서비스별 인증을 진행 할 수 있습니다.
결과 테스트
이제 Api 게이트웨이를 통해서 인증과정이 제대로 이루어지는지 확인해보도록 하겠습니다.
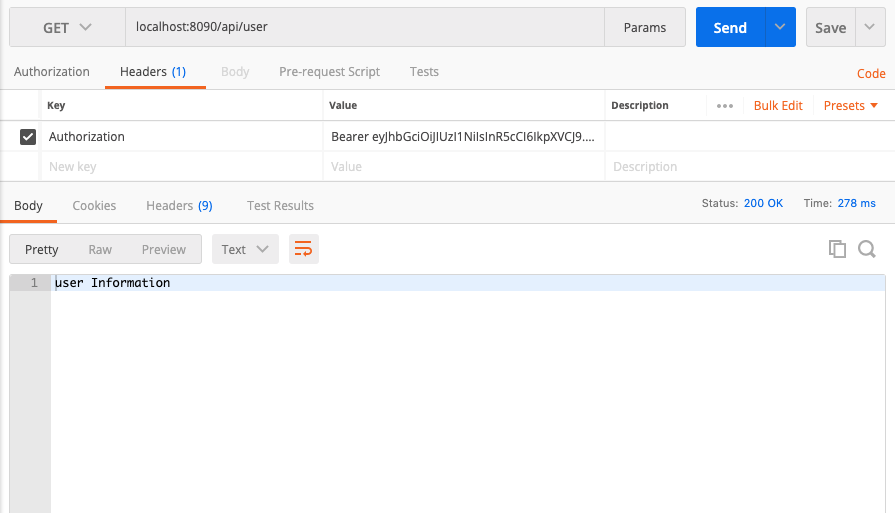
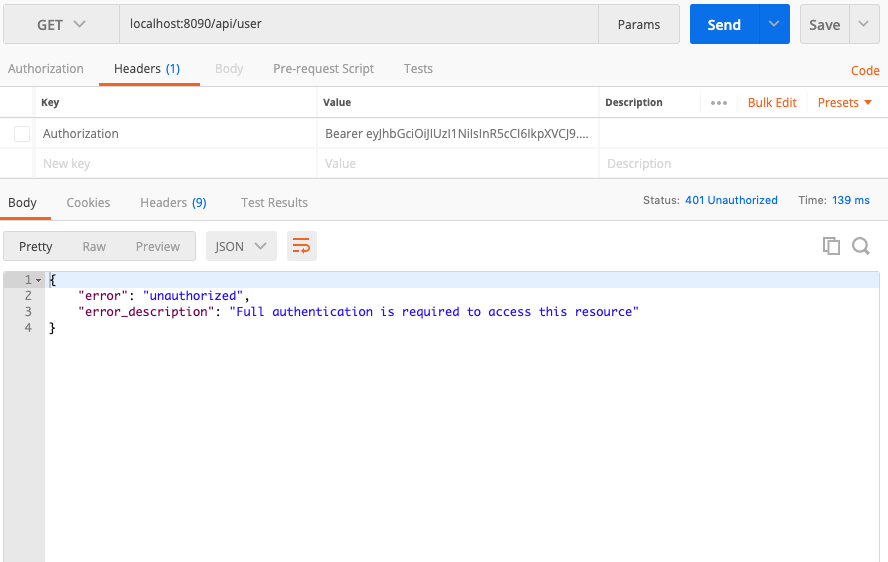
Api 서버에 직접 요청했을때와 같은결과가 나오는것을 확인할수 있습니다.
마무리
MSA 에서의 기본적인 OAuth인증 과정을 진행해보았습니다. 인증은 모든 요청의 가장 첫과정으로써 이제 서비스별, 유저별로 접근을 제어 해줄수 있게 되었습니다. 이전 과정들에 비해 조금 복잡하다고 생각하실수도 있지만 조금만 이해하면 간단하게 사용 할 수 있으실겁니다. 다음챕터에서는 전체적인 서비스 구현으로 MSA내에서 서비스들이 어떻게 유기적으로 동작하는지 알아보도록 하겠습니다.
샘플 프로젝트
위 프로젝트는 다음 링크에서 확인하실수 있습니다.
https://github.com/taes-k/spring-example/tree/master/spring-msa