2.7 Spring Security (2) - 스프링 시큐리티
이전 챕터에서는 쿠키와 세션에대해 알아보고 세션으로 로그인처리를 하는 방법에대해서 알아보았습니다. 이제 스프링에서 제공하는 스프링 시큐리티 프레임워크를 사용하여 예제 프로젝트를 진행해보고, 스프링 시큐리티의 동작 원리에대해서 알아보도록 하겠습니다.
Contents List
2.7.1) 스프링시큐리티
공식문서에서는 스프링시큐리티에 대해서 다음과같이 소개하고있습니다.
스프링시큐리티는 강력하고 커스터마이징 가능한 인증 및 액세스 컨트롤을 제공해준다.
스프링 기반 애플리케이션 보안을위한 사실상의 표준이다.
참고 : https://docs.spring.io/spring-security/site/docs/5.2.0.BUILD-SNAPSHOT/reference/htmlsingle/
스프링 시큐리티 인증의 핵심은 ‘필터’라고 볼수있습니다. 필터들이 애플리케이션에 대한 request와 response를 감싸서 처리하면서 인증을 확인하는 과정을 거칠수 있게 해줍니다. 정확한 동작원리는 프로젝트를 직접 진행해 본 후에 알아보도록 하겠습니다.
프로젝트 세팅
스프링 시큐리티를 적용하기전, 먼저 기본 MVC 프로젝트를 구성해보도록 하겠습니다.
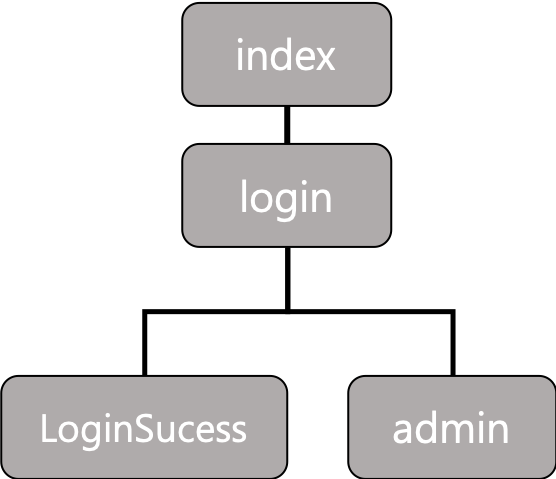
해당 프로젝트의 사이트맵은 다음과 같이 구성되어 있습니다.
Controller
// PageController.java

@Controller
public class PageController {

    @Autowired
    MainNewsServiceImpl mainNewsService;

    @RequestMapping(value="/")
    public String indexPage() {

        return "index";
    }

    @RequestMapping(value="/login")
    public String loginPage() {

        return "login";
    }

    @RequestMapping(value="/loginSuccess")
    public String loginSuccessPage() {

        return "loginSuccess";
    }

    @RequestMapping(value="/admin")
    public String adminPage() {

        return "admin";
    }
}
User Entity
실제 회원 관리를 위한 Entity를 만들어보도록 하겠습니다.
// User.java

    @Entity
    @Table(name="T_USER")
    @Data
    public class User {

    @Id
    @GeneratedValue(strategy=GenerationType.IDENTITY)
    @Column(name = "seq")
    private int id;

    @Column(name = "id", length = 20, unique = true, nullable = false)
    private String uid;
    @Column(length = 50, nullable = false)
    private String password;
    @Column(length = 10, nullable = false)
    private String name;
    @Column(nullable = false)
    private Date date;

    @OneToMany(cascade=CascadeType.ALL, fetch=FetchType.EAGER)
    @JoinColumn(name="user_seq")
    private List<UserRole> roles = new ArrayList<UserRole>();
}
스프링시큐리티에서는 유저마다 ‘Role’이라는 역할로써 유저들을 구분이 가능합니다. 이를위해 UserRole Entity도 만들어 주도록 하겠습니다.
// UserRole.java

@Entity
@Table(name="T_USER_ROLE")
@Data
public class UserRole {

    @Id
    @GeneratedValue(strategy=GenerationType.IDENTITY)
    @Column(name = "seq")
    private int seq;

    @Column(name = "user_seq")
    private int user;

    @Column(length = 200, nullable = false)
    private String role;
}
Repository
uid를 통해 데이터를 가져오는 dao설정을 추가하도록 하겠습니다.
@Repository
public interface UserDao extends JpaRepository<User, Integer> {
    public User findByUid(String uid);
}
@Repository
public interface UserRoleDao extends JpaRepository<UserRole, Integer> {
}
View
// index.jsp

<%@ page language="java" contentType="text/html; charset=UTF-8" pageEncoding="UTF-8"%>
<%@ taglib prefix="c" uri="http://java.sun.com/jsp/jstl/core" %>
<!DOCTYPE html>
<html>
    <body>
        Index 페이지 입니다. <br>
        <button onclick="location.href='/login'">로그인 페이지 이동</button> <br>
        <button onclick="location.href='/loginSuccess'">로그인 성공 페이지 이동</button> <br>
        <button onclick="location.href='/admin'">어드민 페이지 이동</button>
    </body>
</html>
// login.jsp

<%@ page language="java" contentType="text/html; charset=UTF-8" pageEncoding="UTF-8"%>
<%@ taglib prefix="c" uri="http://java.sun.com/jsp/jstl/core" %>
<!DOCTYPE html>
<html>
    <body>
        Login 페이지 입니다. <br>
        <form action="/loginProcess"  method='POST'>
            ID : <input type="text" name="id" placeHolder="ID"></input>
            PW : <input type="password" name="password" placeHolder="Password"></input>
            <button type="submit" id="loginSubmit">로그인</button>
        </form>
    </body>
</html>
// loginSuccess.jsp

<%@ page language="java" contentType="text/html; charset=UTF-8" pageEncoding="UTF-8"%>
<%@ taglib prefix="c" uri="http://java.sun.com/jsp/jstl/core" %>
<!DOCTYPE html>
<html>
    <body>
        로그인 성공 페이지입니다.
    </body>
</html>
// index.jsp

<%@ page language="java" contentType="text/html; charset=UTF-8" pageEncoding="UTF-8"%>
<%@ taglib prefix="c" uri="http://java.sun.com/jsp/jstl/core" %>
<!DOCTYPE html>
<html>
    <body>
        Admin 관리자 페이지 입니다.
    </body>
</html>
위와같이 4가지 예제 뷰 작성이 완료되었습니다. 현재상태에서는 접속해보시면 모든 페이지 접속이 잘 되실텐데, 스프링시큐리티를 적용시켜 Access control과 유저로그인 상태관리를 해보도록 하겠습니다.
2.7.2) 스프링시큐리티 적용
이제 직접 예제프로젝트에 스프링시큐리티를 적용해보도록 하겠습니다.
gradle 설정
// build.gradle

compile 'org.springframework.boot:spring-boot-starter-security'
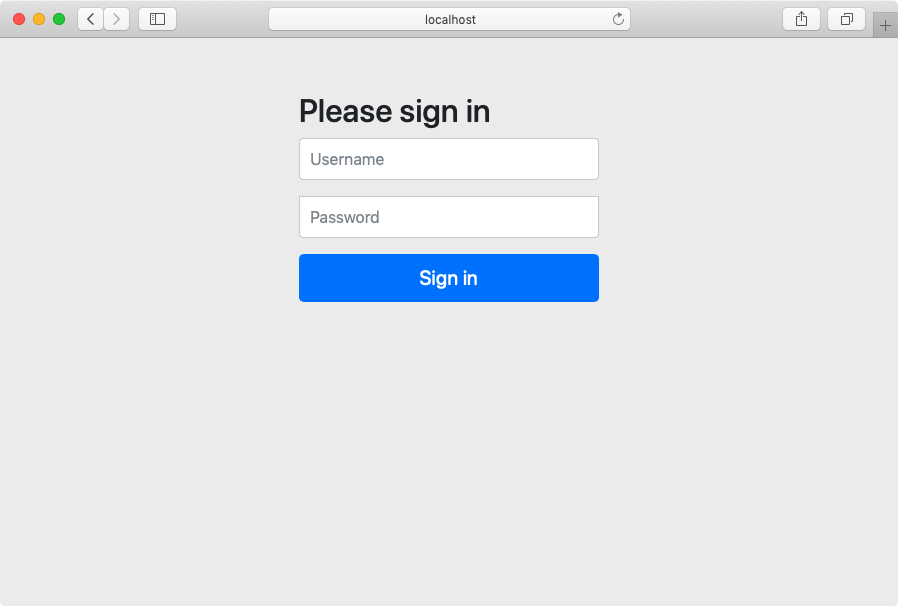
gradle 설정으로 spring security dependency를 추가해주게 되면, 사실 바로 Spring security가 적용되어집니다. spring security가 적용된 상태로 웹에 접근하게되면 가장먼저 스프링 시큐리티 default 로그인페이지를 만나보시게 될겁니다.
우리는 이제 dfeault로 설정되어있는 스프링시큐리티를 커스터마이징 하기위해 시큐리티 설정을 해 주어야 합니다.
Spring Security 설정
자 이제 본격적인 스프링시큐리티 설정을 해보도록 하겠습니다.
// SpringSecurityConfig.java

@EnableWebSecurity
public class SpringSecurityConfig extends WebSecurityConfigurerAdapter  {

    @Override
    public void configure(HttpSecurity http) throws Exception {
        http.authorizeRequests() // URL별 Access control을 설정이 가능합니다.
                .antMatchers("/admin").hasRole("ADMIN")
                .antMatchers("/loginSuccess").authenticated()
                .antMatchers("/","/login").permitAll()
            .and().formLogin().permitAll() // 로그인관련 설정을 진행합니다.
                .loginPage("/login")
                .usernameParameter("id")
                .passwordParameter("password")
                .loginProcessingUrl("/loginProcess")
                .defaultSuccessUrl("/loginSuccess")
            .and().logout() // 로그아웃관련 설정을 진행합니다.
                .logoutUrl("/logout")
                .logoutSuccessUrl("/")
                .deleteCookies("JSESSIONID")
                .invalidateHttpSession(true)
                .permitAll()
            .and().csrf().disable() // 스프링 시큐리티에서는 기본적으로 csrf와 헤더를 체크하게되어 있는데 위의 설정을 통해 체크없이 진행할수 있도록 설정해줍니다.
                headers().disable();

    }

    @Override
    public void configure(WebSecurity web) throws Exception {
        // 위에서 진행한 http Access control 설정보다 앞서 인증에서 제외시켜줄 목록들을 정의할수 있습니다. 주로 리소스들에 대하여 ignore 시켜줍니다.
        web.ignoring().antMatchers("/css/**", "/script/**", "/image/**", "/fonts/**", "lib/**");
    }

    @Override
    public void configure(AuthenticationManagerBuilder builder)
    throws Exception {
        // 위 AuthenticationManagerBuilder 설정은 실제로 인증이 일어나는 provider를 커스터마이징한 AuthenticationProvider로 등록시켜주는 설정입니다. 해당 설정을통해 인증과정을 직접 구현해줄수 있습니다.
        builder.authenticationProvider(customAuthenticationProvider());
    }

    @Bean
    public AuthenticationProvider customAuthenticationProvider() {
        return new CustomAuthenticationProvider();
    }
}
CustomAuthenticationProvider 설정
해당 클래스는 AuthenticationProvider를 implemnts 받아서 구현해야 합니다.
// CustomAuthenticationProvider.java

public class CustomAuthenticationProvider implements AuthenticationProvider {

    @Resource (name="UserInformationService")
    UserInformationService userInformationService;

    @Override
    public Authentication authenticate(Authentication authentication) throws AuthenticationException {
        Collection<? extends GrantedAuthority> authorities;

        String id = authentication.getName();
        String password = (String) authentication.getCredentials();


        UserInformation user = (UserInformation) userInformationService.loadUserByUsername(id);// ID 확인
        user.getUsername();
        authorities = user.getAuthorities();

        System.out.println("AUTHORIES :: " + authorities);

        BCryptPasswordEncoder bCryptPasswordEncoder = new BCryptPasswordEncoder();

        if(!bCryptPasswordEncoder.matches(password, user.getPassword())) // PW 확인
        throw new BadCredentialsException("wrongPassword"); // PW 틀림

        return new UsernamePasswordAuthenticationToken(user, user.getPassword(), authorities);
    }

    @Override
    public boolean supports(Class<?> authentication) {
        return  authentication.equals(UsernamePasswordAuthenticationToken.class);
    }
}
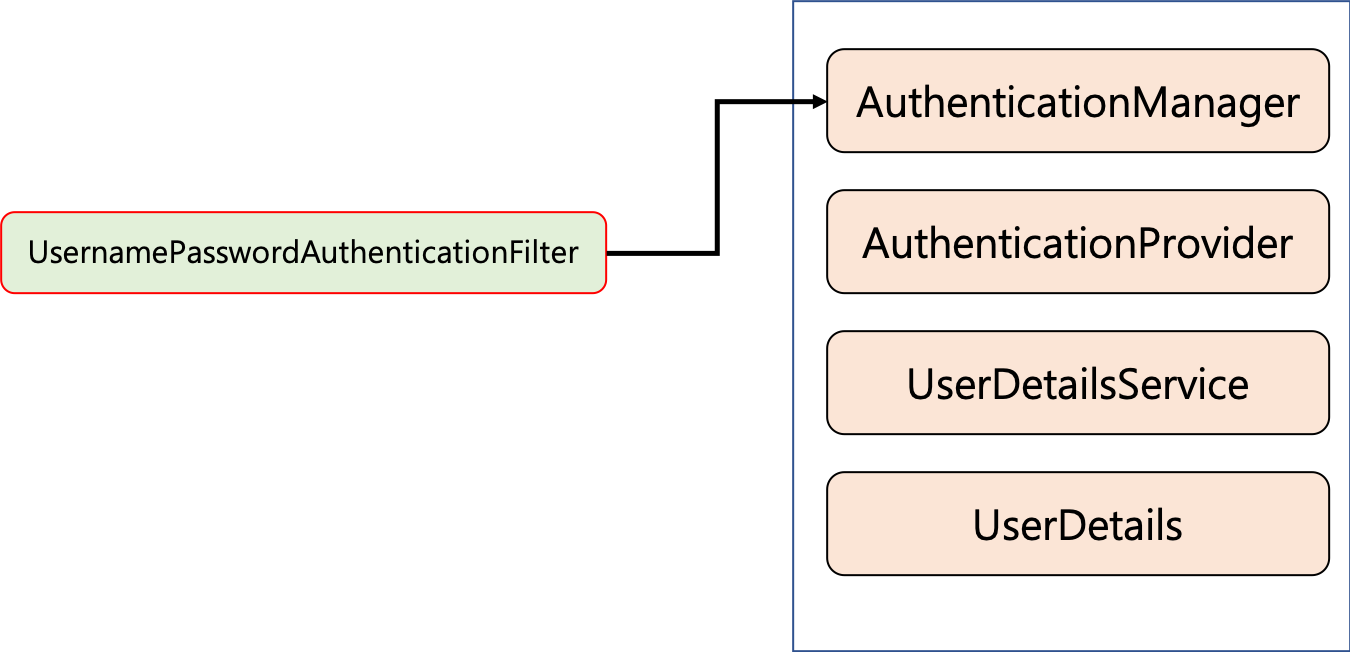
해당 authenticate메서드에서는 http loginform 에서 설정해두었던 id 와 password가 전달되어 실제적으로 데이터베이스의 저장내용과 일치하는지 검증하는 과정을 처리하게됩니다. 이때 User의 정보는 스프링 시큐리티에서 사용하는 UserDetails를 사용하기때문에 UserDetails와 UserDetailservice를 implements 받아서 구현해주어야 합니다.
UserDetails
  // UserInformation.java

  @Data
  public class UserInformation implements UserDetails {

      private String username;
      private String password;
      private List<GrantedAuthority> authorities;

      @Override
      public boolean isAccountNonExpired() {
          // TODO Auto-generated method stub
          return false;
      }

      @Override
      public boolean isAccountNonLocked() {
          // TODO Auto-generated method stub
          return false;
      }

      @Override
      public boolean isCredentialsNonExpired() {
          // TODO Auto-generated method stub
          return false;
      }

      @Override
      public boolean isEnabled() {
          // TODO Auto-generated method stub
          return false;
      }
  }
UserDetailsService
// UserInformationService.java

@Service ("UserInformationService")
public class UserInformationService implements UserDetailsService {

    @Resource (name="UserDao")
    private UserDao UserDao;

    private static final Logger logger = LoggerFactory.getLogger(CustomAuthenticationProvider.class);

    @Override
    public UserDetails loadUserByUsername(String username) throws UsernameNotFoundException {

        UserInformation user  = new UserInformation();
        try{
            User userEntity = UserDao.findByUid(username);
            user.setUsername(userEntity.getUid());
            user.setPassword(userEntity.getPassword());
            user.setAuthorities(makeGrantedAuthority(userEntity.getRoles()));
            }catch(Exception e){
            throw new UsernameNotFoundException("wrongId"); // Email 로그인, 저장된 ID 없음
        }
        return user;
    }

    public List<GrantedAuthority> makeGrantedAuthority(List<UserRole> roles){
        List<GrantedAuthority> list = new ArrayList<>();
        roles.forEach(role -> list.add(new SimpleGrantedAuthority(role.getRole())));
        return list;
    }
}
loadUserByUsername 메서드는 Dao를 통한 DB접근을 통해 저장되어있는 user정보를 직접적으로 가져오게되고, 만약 해당 유저정보를 찾지못할시 UsernameNotFoundException 을 throw하여 통해 해당 ID가 없음을 알리며 에러를 발생시킬수 있습니다.
Access control
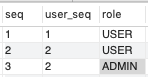
이제 스프링 시큐리티 설정이 완료되었습니다. 웹페이지를 접속하기 전에 데이터베이스 저장 값들을 확인해보도록 하겠습니다. 다음과같은 user데이터가 저장되어있습니다.
T_USER

T_USER_ROLE
이제 직접 페이지로 접근해서 Access Control이 잘 되는지 확인해보도록 하겠습니다.
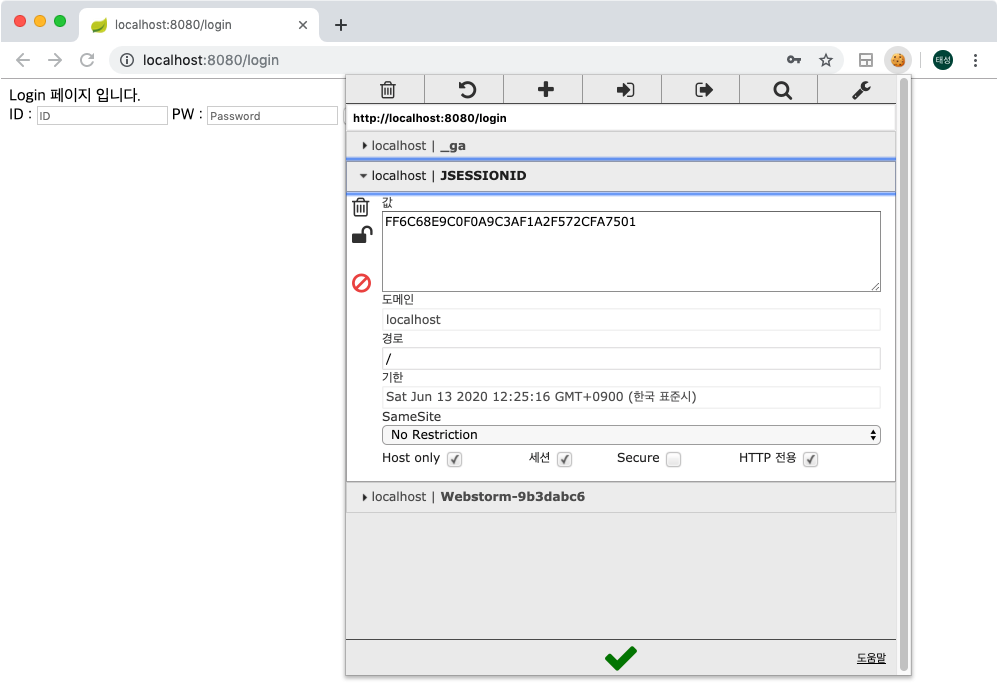
loginSuccess page로 이동하려했지만 .antMatchers("/loginSuccess").authenticated() 설정으로 인해 인증되지 않은 사용자로 처리되어 login page로 redirect 되었습니다.
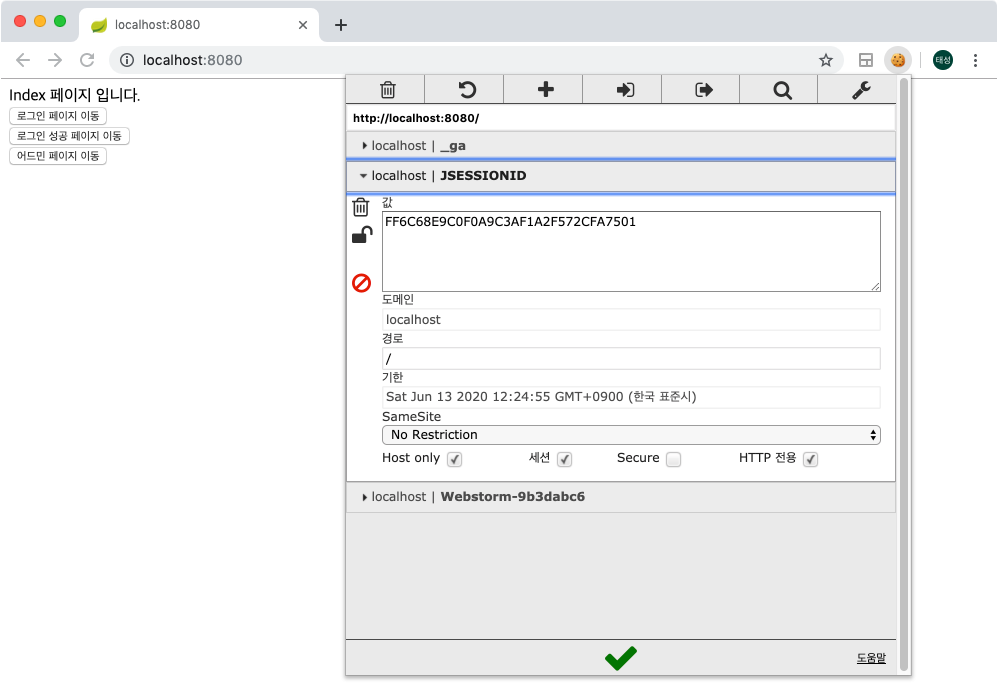
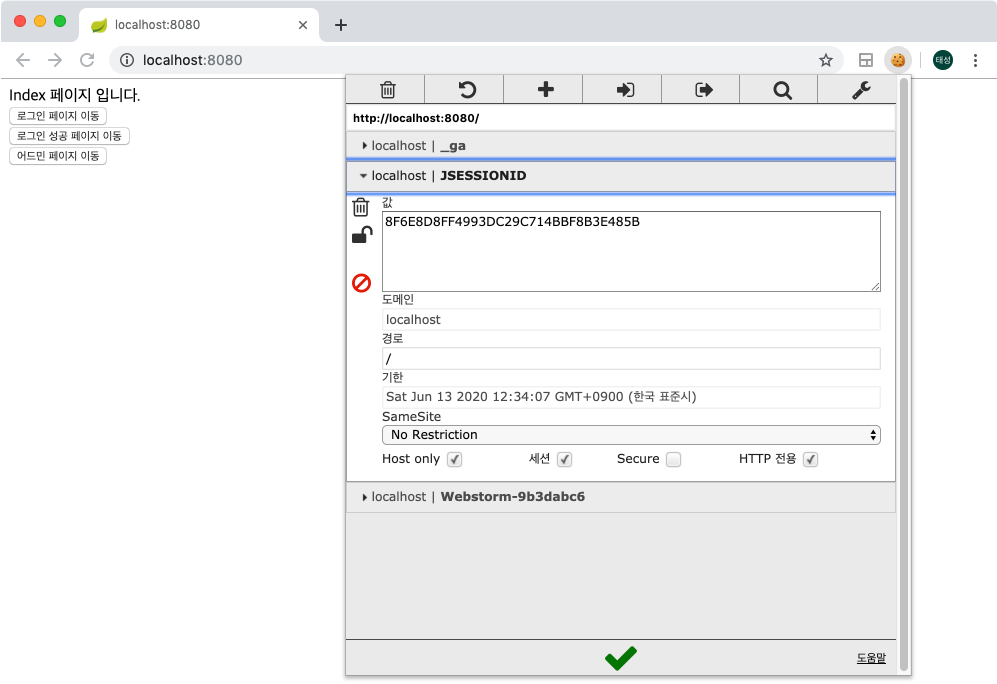
로그인을 하게되면 설정해준것과 같이 /loginSuccess로 URL이동이 일어나며 쿠키를 확인하시면 로그인 성공 이후에 세션아이디를 새로 할당하기 때문에 JSESSIONID가 변경되신것을 확인하실수 있습니다. 이후에는 다른페이지로 이동을 하셔도 JSESSIONID는 유지되어 세션상태를 유지할수 있습니다.

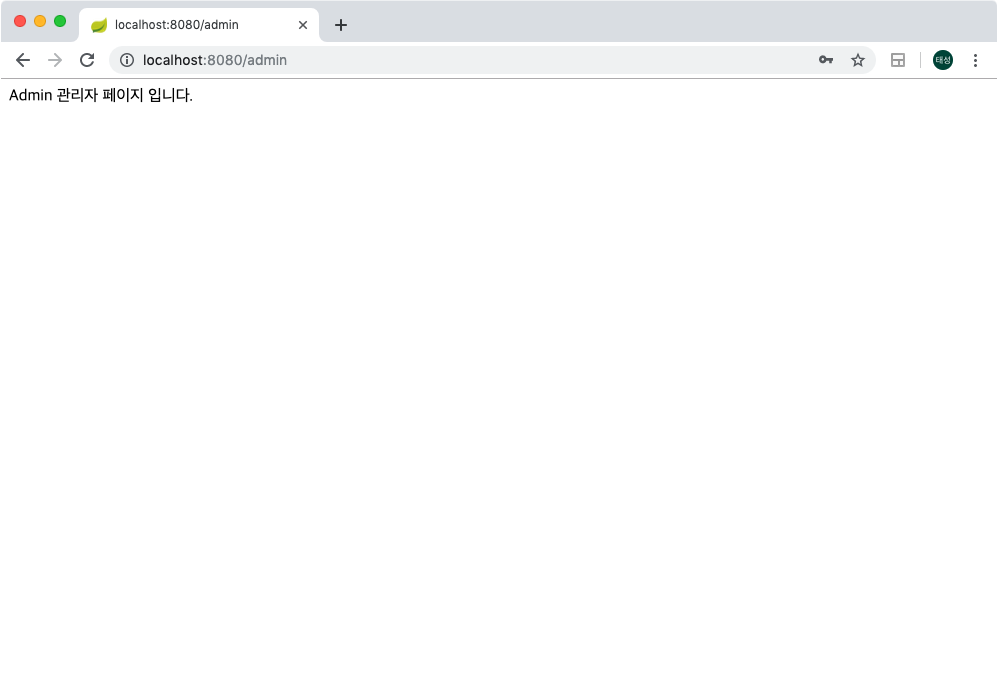
그렇다면 ADMIN ROLE만 Access 가능하게 설정해둔 /admin 페이지로 이동하면 어떻게될까요?
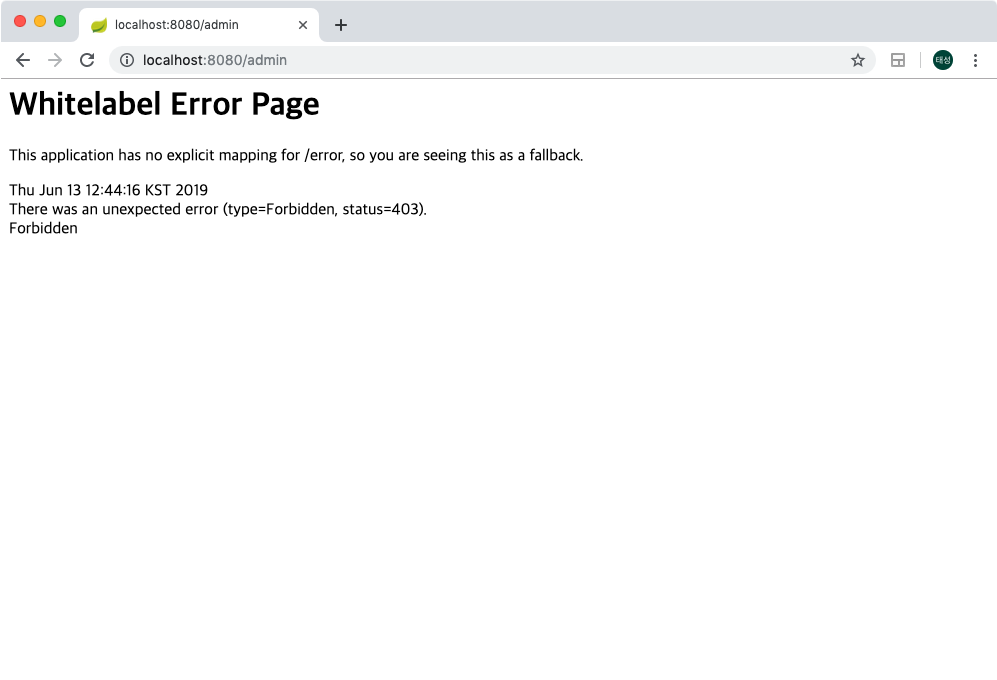
역시나 403 Forbidden Error (접속권한 오류)를 호출하면서 접근에 실패하게됩니다. (오류페이지는 따로 설정해 주셔야합니다 ..!)
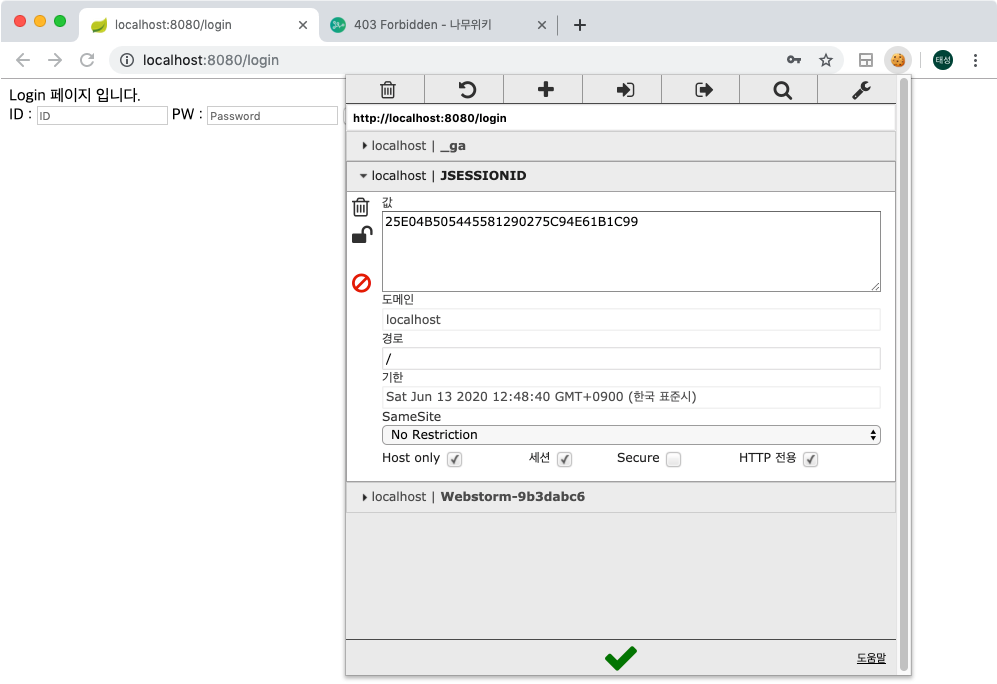
또 한가지를 확인해보기위해 현재상태에서 JSESSIONID 쿠키를 삭제해보도록 하겠습니다. 이전 챕터에서 말씀드렸다시피 세션은 쿠키에 저장된 SESSIONID 값을통해 클라이언트를 구분한다고 말씀드렸는데, 이 쿠키값을 삭제하게되면 로그인정보가 남아있는 세션을 찾을수 없기때문에 새로운 SESSIONID를 할당받으며 미 로그인 상태로 돌아가게 되는것을 확인할 수 있습니다.
admin 계정으로 로그인시, ADMIN ROLE이 부여되어 /admin 페이지에 잘 접속까지 되는것또한 확인 가능합니다.
세션값 확인
위와같은 방법으로 스프링 시큐리티가 잘 작동하는것을 확인했는데, 정말 세션에 데이터들이 잘 저장되어있는지 확인해보시고 싶으실겁니다. 직접 눈으로 확인하기위해 loginSuccess.jsp를 다음과같이 수정해보도록 하겠습니다.
// loginSuccess.jsp

<%@ page language="java" contentType="text/html; charset=UTF-8" pageEncoding="UTF-8"%>
<%@ taglib prefix="c" uri="http://java.sun.com/jsp/jstl/core" %>
<!DOCTYPE html>
<html>
    <body>
    로그인 성공 페이지입니다.<br>
    ${sessionScope.SPRING_SECURITY_CONTEXT.authentication.principal.username}님이 로그인 하셨습니다. <br>
        <form action="/logout"  method='POST'>
            <button type="submit" id="loginSubmit">로그아웃</button>
        </form>
    </body>
</html>
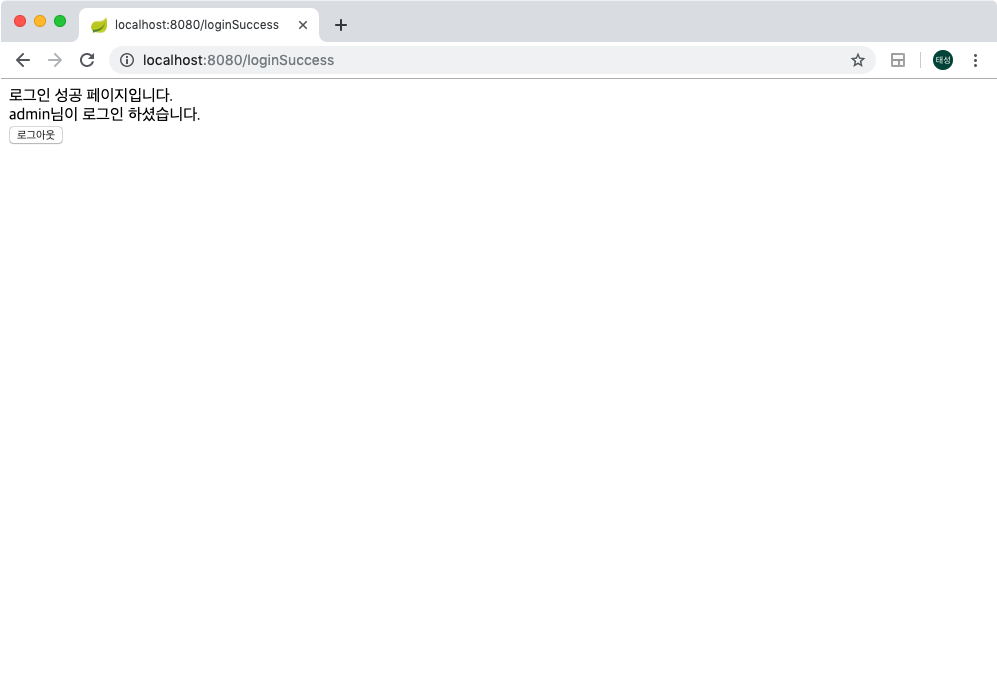
위처럼 세션에는 스프링시큐리티 컨텍스트가 통채로 저장되어 관리가 되어지는것을 확인 할 수 있습니다.
2.7.3) 스프링 시큐리티 동작원리
처음에 말씀드렸던것 처럼 스프링 시큐리티는 여러개의 필터들에 의해 인증(Authentication)과 권한(Authorization)처리가 진행됩니다. 이 필터들의 체인들을 ‘필터체인프록시’라고 부르며 다음과같은 종류와 순서로써 동작합니다.
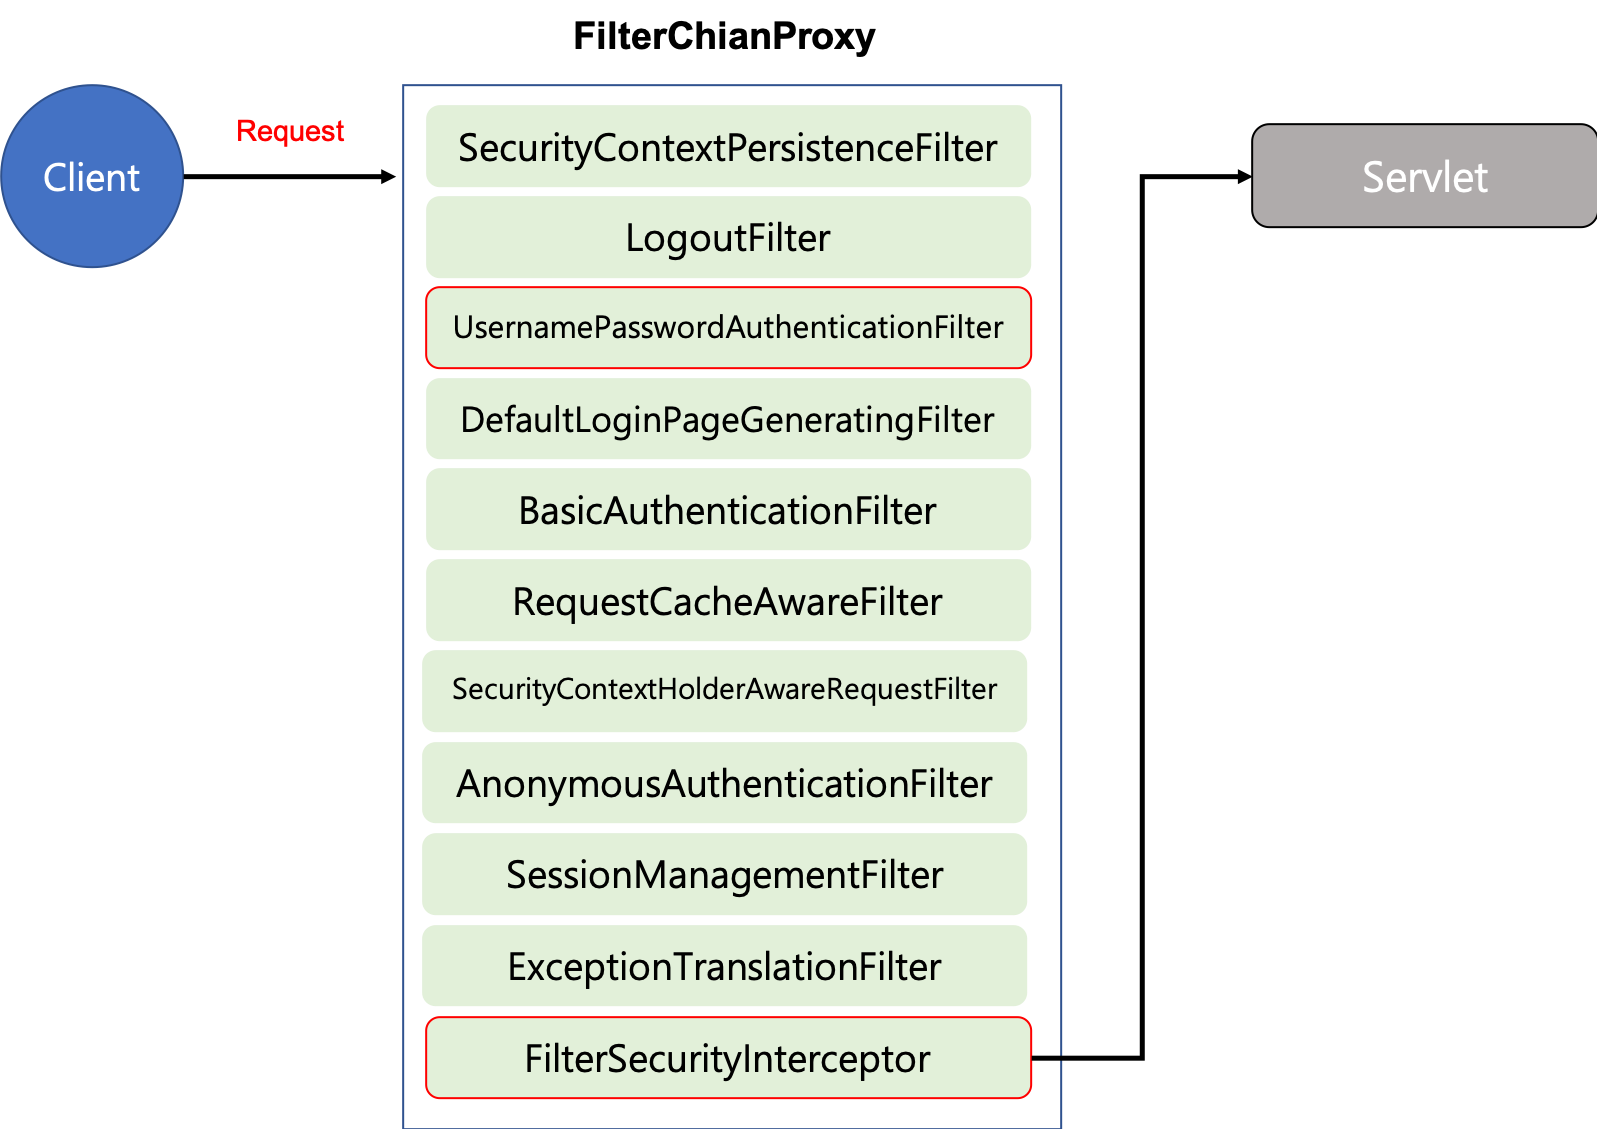
특히 예제를 진행하면서 커스터마이징을위해 설정했던 과정이 UsernamePasswordAuthenticationFilter 단계에서 일어나게 됩니다.
마무리
(이번 챕터는 분량조절에 실패한 챕터가 된것 같습니다 ㅠㅠ)
아주 간단한 예제프로젝트를 통해 스프링 시큐리티를 적용하는 방법과 동작원리를 알아보았습니다. Spring을 사용하시는 대부분의 프로젝트에서 이미 스프링시큐리티를 사용중일텐데, 정확한 동작 원리와 과정을 알아가는 시간이셨길 바랍니다.
샘플 프로젝트
위 프로젝트는 다음 링크에서 확인하실수 있습니다.
https://github.com/taes-k/spring-example/tree/master/spring-security