1.2 Spring은 어떻게 동작하는가?
앞서서 스프링을 사용하는 이유에대해서 알아보았는데, 과연 스프링은 어떻게 동작하길래 그러한 특징들을 가지는것인지 알아보도록 하겠습니다.
Contents List
1.2.1) IoC Container
IoC와 DI
스프링프레임워크를 말할때 IoC와 DI를 주요 핵심 개념으로 이야기합니다.
먼저 IoC(Inversion of Control)는 서비스 제어의 흐름을 역전시켰다는 뜻으로, 개발자가 아닌 프레임워크가 흐름을 제어하는 주체가되어 필요할때 코드를 호출하며 사용하게됩니다.
다음은 DI(Dependency Injection)를 알아보도록 합시다. 하나의 객체가 다른객체를 참조할때 객체간의 의존성을 갖는다고 말을합니다.
public class SimpleMovieLister {

    // the SimpleMovieLister has a dependency on a MovieFinder
    private MovieFinder movieFinder;

    // a constructor so that the Spring container can inject a MovieFinder
    public SimpleMovieLister(MovieFinder movieFinder) {
    this.movieFinder = movieFinder;
    }

    // business logic that actually uses the injected MovieFinder is omitted...
}
위의 SimpleMovieLister 오브젝트는 생성자에서 MovieFinder 오브젝트를 받으면서 MovieFinder 오브젝트에 의존성을 갖게되었습니다. 의존성을 갖게되었다는 말은 하나의 객체의 변화에 다른객체에 영향을 끼칠수 있게 되었다는 뜻입니다. 위의 예시 오브젝트로 설명을 한다면, News 오브젝트가 변경되면 SportsNews 오브젝트와 기타 모든 News 오브젝트에 의존하는 모듈까지 함께 변경되어야 할 수 있습니다.
스프링은 이러한 객체들간의 의존성을 줄이기위한 방법으로 IoC/DI를 하나로 묶어서 제공을 하고 있습니다. 객체 선언과정을 스프링 프레임워크가 미리 대신 해줌으로써(IoC) 그저 객체를 가져다가 (DI) 사용 할수 있게 해줍니다. 이 과정을 설명하기 위한 모식도를 스프링 공식문서에서는 제공하고 있습니다.
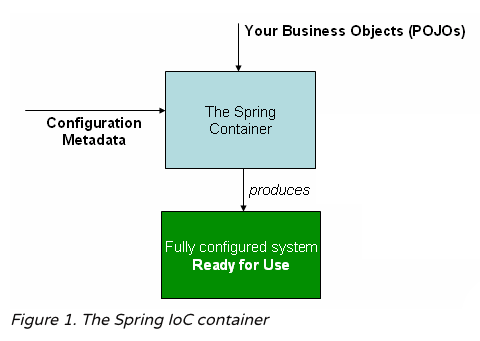
위의 모식도를 보시면 ‘Your Business Objects’를 ‘Configuratioin Metadata’를 통해 Spring Container에 등록시켜 본 시스템에 제공해주는 모식도 내용을 확인하실수 있습니다. 여기서 사용되는 Container가 바로 IoC Container 입니다.
DI의 장점
그렇다면, 프레임워크에서 의존성주입을 제공해줌으로써 어떤 장점이 있을까요?
Code is cleaner with the DI principle, and decoupling is more effective when objects are provided with their dependencies. The object does not look up its dependencies and does not know the location or class of the dependencies. As a result, your classes become easier to test, particularly when the dependencies are on interfaces or abstract base classes, which allow for stub or mock implementations to be used in unit tests.
- 코드가 깔끔해진다.
- 객체들간의 종속성이 감소한다.
- 재사용성이 증가한다.
- 유닛 테스트가 쉬워진다.
DI를 하기위한 준비
스프링의 DI를 활용하기위해서는 DI를 사용할 객체를 프레임워크에 알려줘야 합니다. 위의 IoC/DI의 모식도에서 보여지는 ‘Configuration Metadata’의 설정과정인데요 이렇게 IoC Container에 등록되어지는 객체들을 ‘Bean’이라고 합니다.
먼저 Bean 을 등록하기 위한 방법으로는 3가지 방법이 있습니다.
- XML-Based configuration
- Annotation-based configuration : after Spring 2.5
- Java-based configuration : after Spring 3.0
현재 많은 개발자들이 사용하는 방법은 Java기반 설정방식이지만, 상황 혹은 취향에따라 어느방법을 쓰셔도 관계는 없습니다.
Are annotations better than XML for configuring Spring?
The introduction of annotation-based configuration raised the question of whether this approach is “better” than XML. The short answer is “it depends.” The long answer is that each approach has its pros and cons, and, usually, it is up to the developer to decide which strategy suits them better. Due to the way they are defined, annotations provide a lot of context in their declaration, leading to shorter and more concise configuration. However, XML excels at wiring up components without touching their source code or recompiling them. Some developers prefer having the wiring close to the source while others argue that annotated classes are no longer POJOs and, furthermore, that the configuration becomes decentralized and harder to control.
No matter the choice, Spring can accommodate both styles and even mix them together. It is worth pointing out that through its JavaConfig option, Spring lets annotations be used in a non-invasive way, without touching the target components source code and that, in terms of tooling, all configuration styles are supported by the Spring Tool Suite.
예시를 통해 알아보기 위해 객체를 Bean으로 등록시켜보도록 하겠습니다.
// Java-based Configuration

@Configuration
    public class AppConfig {

    @Bean
    public MyService myService() {
        return new MyServiceImpl();
    }
}
// XML-based Configuration

<beans>
    <bean id="myService" class="com.acme.services.MyServiceImpl"/>
</beans>
어떤 방식으로 설정을 하든 똑같이 bean으로 등록이 가능합니다. 위의 설정 과정을 통해 등록된 빈은 IoC Container를 생성할때 함께 생성되어집니다.
하지만 모든 bean들이 모두 Spring의 초기화 과정에서 등록되지는 않습니다. bean에 대해서는 다음 섹션에서 좀더 자세히 알아보도록 하겠습니다.
1.2.2) Bean
Bean 사용법
사실 저는 IoC와 DI에대해 잘 몰랐을때도 스프링에서 제공해주는 이 기능들을 잘 활용해서 사용해 왔습니다. 잘 모르고 썼지만 잘 썼던 요령들을 통해 실제 프로젝트에서 IoC/DI 가 어떻게 사용되는지 살펴보도록 하겠습니다.
다음은 Database 연결을 설정하는 Datasource config와 DAO 코드 예제입니다.
//Datasource Config

@Configuration
public class DatasourceConfig {

    @Autowired
    ApplicationContext applicationContext;

    @Primary
    @Bean(name="dataSource")
    @ConfigurationProperties(prefix = "spring.datasource")
    public DataSource dataSource() {
        return DataSourceBuilder.create().build();
    }

    @Primary
    @Bean(name = "sqlSessionFactory")
    public SqlSessionFactory sqlSessionFactory() throws Exception {
        SqlSessionFactoryBean sqlSessionFactoryBean = new SqlSessionFactoryBean();
        sqlSessionFactoryBean.setDataSource(dataSource());
        sqlSessionFactoryBean.setMapperLocations(applicationContext.getResources("classpath:mybatis/mapper/sql.xml"));

        return sqlSessionFactoryBean.getObject();
    }

    @Primary
    @Bean(name = "sqlSessionTemplate")
    public SqlSessionTemplate sqlSessionTemplate() throws Exception {
        return new SqlSessionTemplate(sqlSessionFactory());
    }
}
// DAO

public class Dao{

    @Autowired
    @Qualifier("sqlSessionTemplate")
    private SqlSessionTemplate sqlSession;
}
아직은 이코드들이 어떤 동작을 하는지 모르셔도 좋습니다. 다만, Bean이 어떻게 등록하고 사용되는지 알아보도록 합시다.
일반적으로, DB connection을 관리하는 Datasource는 하나의 객체로써 연결풀을 관리를 하도록 합니다. 이를위해 스프링에서는 싱글톤 방식으로 IoC Container에 등록해 여러 DAO에 주입시켜 사용할수 있도록 합니다.
위의 예제를 보면, @Bean 어노테이션과 @Autowired 어노테이션을 이용해 IoC 컨테이너에 등록하고, IoC 컨테이너로부터 주입받아 사용하는것을 확인 할 수 있습니다.
Bean scope
그렇다면, 모든 등록된 빈들이 IoC 컨테이너와 함께 생성되고 하나의 객체로 관리되어 질까요?
Bean들은 기본적으로는 누차말해왔던 싱글톤 객체로 관리됩니다. 하지만 Bean마다의 Scope 설정을 통해 life-cycle과 객체의 생성형태를 관리할수 있습니다. 이는 객체가 어디까지 영향을 미치는지 나타내는것으로 Bean의 사용 목적에따라 달라질 것입니다.
| Scope | 설명 |
|---|---|
| singleton | Spring IoC Container내에서 단 하나의 객체만 존재한다. |
| prototype | Spring IoC Container내에서 다수의 객체가 존재 가능하다. |
| request | HTTP Request life-cycle 내에 단 하나의 객체만 존재한다. |
| session | HTTP Session life-cycle 내에 단 하나의 객체만 존재한다. |
| application | ServletContextlife-cycle 내에 단 하나의 객체만 존재한다. |
| web-socket sesison | WebSocket life-cycle 내에 단 하나의 객체만 존재한다. |
싱글톤으로 사용하게되면 하나의 객체가 여러 참조 위치에서 사용되기때문에 변화가 생길경우 타 참조위치들에 변화를 동기화시키는데 비용이 들 수 있기때문에 사용 목적에 따라 싱글톤으로 사용할지 비싱글톤으로 사용할지 고려를 해야합니다.
일반적으로 싱글톤으로 사용하는 객체들의 예시로는 다음과 같다.
- 상태가 없는 객체
- 데이터를 불러오는 용도로 사용하는 객체
- 공유가 필요한 상태를 지닌 객체
- 사용빈도가 매우 높은 객체
#### Spring Component 위에서는 직접적인 경로지정을 통한 Bean 등록 방법들을 확인했습니다. 하지만 스프링에서는 스테레오 타입(stereo type)을 이용하여 해당 클래스를 식별하여 자동으로 Bean으로 등록 해 주는 기능 또한 제공하고 있습니다.
| 스테레오 타입 | 설명 |
|---|---|
| @Component | 기본 스테레오 타입으로, 일반적인 용도를 가진 컴포넌트들을 지칭해준다. |
| @Controller | @Component 에서 특화된 타입으로, Web MVC 에서 Controller 컴포넌트를 지칭해준다. |
| @Service | @Component 에서 특화된 타입으로, 비즈니스 로직을 다루는 서비스 레이어를 지칭해준다. |
| @Repository | @Component 에서 특화된 타입으로, 데이터 접근 객체를 지칭해준다. |
위의 @Controller, @Service, @Repository 스테레오 타입 어노테이션들을 통해 컴포넌트 클래스를 목적에 맞게끔 선언해주면 미리 세팅된 기능들을 부여 받을 수 있으며 aspects에 더 연관성을 부여해 줄 수 있습니다.
@Service
public class SimpleMovieLister {

    private MovieFinder movieFinder;

    @Autowired
    public SimpleMovieLister(MovieFinder movieFinder) {
        this.movieFinder = movieFinder;
    }
}
@Repository
public class JpaMovieFinder implements MovieFinder {
    // implementation elided for clarity
}
다음과 같은 Component 어노테이션 사용으로 손쉽게 빈에 등록하고, 사용 할 수 있습니다.
Beanfactory와 ApplicationContext
우리가 여태까지 IoC Container라 지칭했던 컨테이너는 Spring Container라고도 이야기 하며 빈팩토리 혹은 애플리케이션 컨텍스트 라고도 불립니다. 정확하게 말하자면, 이 IoC Container에는 2가지 종류가 있습니다. 위에서 이야기한 빈팩토리와 애플리케이션 컨텍스트 입니다. 사실 애플리케이션 컨텍스트는 빈팩토리 인터페이스를 상속시켜 확장한 클래스로, 빈팩토리의 모든 기능을 지원합니다. 그렇다면 두 컨테이너의 차이점을 공식문서를 통해 알아보도록 하겠습니다.
| Feature | BeanFactory | ApplicationContext |
|---|---|---|
| Bean instantiation/wiring | Yes | Yes |
| Integrated lifecycle management | No | Yes |
| Automatic BeanPostProcessor registration | No | Yes |
| Automatic BeanFactoryPostProcessor registration | No | Yes |
| Convenient MessageSource access (for internalization) | No | Yes |
| Built-in ApplicationEvent publication mechanism | No | Yes |
BeanPostProcessor와 BeanFactoryPostProcessor 은 빈 등록후 변경 및 후처리를 진행할때 사용되는 클래스로, ApplicationContext의 경우 자동으로 해당 클래스를 감지하여 처리 해 줄수 있습니다.
ApplicationContext는 Beanfactory의 모든 기능들을 포함하고, AOP 서비스, 편리한 메시지 소스 접근, 내장 애플리케이션 이벤트 처리 메커니즘 등의 이유들을 바탕으로 공식문서에서는 Beanfactory 보다는 ApplicationContext사용을 권장하고 있습니다.
You should use an ApplicationContext unless you have a good reason for not doing so, with GenericApplicationContext and its subclass AnnotationConfigApplicationContext as the common implementations for custom bootstrapping. These are the primary entry points to Spring’s core container for all common purposes: loading of configuration files, triggering a classpath scan, programmatically registering bean definitions and annotated classes, and (as of 5.0) registering functional bean definitions.
Because an ApplicationContext includes all the functionality of a BeanFactory, it is generally recommended over a plain BeanFactory, except for scenarios where full control over bean processing is needed. Within an ApplicationContext (such as the GenericApplicationContext implementation), several kinds of beans are detected by convention (that is, by bean name or by bean type — in particular, post-processors), while a plain DefaultListableBeanFactory is agnostic about any special beans.
마무리
Spring은 어떻게 동작하는가를 알아보기위해 IoC 컨테이너와 Bean에 대해서 알아보았습니다. 스프링의 코어인 IoC 컨테이너에 대해서 정리 하고 마무리 짓도록 하겠습니다.
- 스프링의 의존성 주입(DI)의 핵심 요소
- Bean의 생성과 소멸 관리(Dependency & life-cycle)
- Context 시작 시 모든 Singleton life-cycle Bean 들을 미리 로딩 시켜둠
- Spring의 AOP기능, 메시지 자원 핸들링, 이벤트 위임, 웹 어플리케이션에서 사용하기 위한 WebApplicationContext와 같은 특정 어플리케이션 컨텍스트를 이용한 통합과 같은 다른 기능을 추가 제공한다
참조 문서
Spring 5.1.6 release docs
https://docs.spring.io/spring/docs/current/spring-framework-reference/core.html#beans-introduction